
public:cb_mirror:lmt_applicant_processing_pdf_files_8219
To view this on the COS website, click here lmt-applicant-processing
To download the pdf file from the COS website, click here LMT_Applicant_Processing.pdf
LMT Applicant Processing
Attachment: 1136/LMTApplicantProcessing.pdf
 v1.1 5/8/19 1 Leadership Management Tool – Applicant Processing Overview The Leadership Management Tool (LMT) of CitizenBuilder (CB) has two primary functions, 1) to process applicants for leadership roles, and ultimately either assign or reject the application, and 2) to manage assigned leaders (who may have more than one assigned role). This document focuses on the process flow for handling the applicants. LMT includes a separate row in the list for each role for each leader, regardless of how that role was associated with the leader’s profile. The normal means for a new role to appear in LMT is for the volunteer to submit an application on the Take Action page of the website, but in some limited situations, some leaders have access to a Leader Positions tab of the profile where a role can be immediately assigned, and it will also appear in LMT. Roles shown in LMT can be in one of the following statuses: Open – New (or reopened) application that has not yet begun the vetting process In Process – The vetting process has been started Onboarding – Applicant has been vetted and is working through the on-boarding steps Assigned – Active leader Former – Previously Assigned , and has been Unassigned Rejected – Not assigned to the role (this also includes most Former leaders from NationBuilder) When first opening LMT, the Status filter will default to Assigned , so to review for open applications, the filter needs to be set to Any , Open , or Open/In Process . To review for applicants working through the on-boarding process, set the filter to Any or Onboarding . The current application flow for roles on the Take Action page requires the applicant to complete the following steps: • Sign in with their CB account – they will need to create an account if one does not already exist • Sign the COS petition, if not already signed • Sign the Volunteer Confidentiality Agreement, if not already signed • Enter or update the contact information, and complete the survey questions (if applicable) • Click Submit Application button  Leadership Management Tool – Applicant Processing v1.1 5/8/19 2 Normal Process Flow Immediately upon submitting the application, it will appear in LMT in Open status. The key steps in the normal flow for processing an application through to Assigned or Rejected status is: • Add Called – Meaningful Interaction note (assigns leader to the application, but stays in Open status; auto-checks the Initial Call Made checklist item) • Add Vetting note (changes status from Open to In Process ; auto-checks the Vetting checklist item) • Add Onboarding Initiated note (changes status from In Process to Onboarding ; auto-checks the Onboarding Initiated checklist item) • Manual check of the following checklist items: o Leadership Role Manual Reviewed o COSUniversity Reviewed o Enrolled in COSUniversity o Reviewed COSAction Email Address • Create the cosaction.com email account, and click on the Send Confirm cosaction Email button (activity note for the account creation appears in the Profile Dashboard, not LMT) • Check for applicant confirming their cosaction.com email account by looking for the auto-check of the COSAction Email Address Confirmed checklist item (any number of resends of the confirm email may be sent if needed) • Send an Invite to the new leader to their state Slack workspace using their cosaction.com account, and when accepted, manually check the Joined Slack Team Using COSAction Email Address checklist item • Add Onboarding Training Completed note (auto-checks the Final Onboarding Training Completed checklist item; enables the Assign button in the Role/Assignment Management section at the bottom) • Adjust the Role and Assignments as appropriate, then click the Assign button (changes status from Onboarding to Assigned ). The new leader’s User menu will now include Dashboard as an option, with access based upon their role and assignments. If at any time during the above process, an applicant is determined not to be a fit for the role being processed, click on the Reject button in the Role/Assignment Management section, and the status will be changed to Rejected , finishing the process. Although LMT allows the above steps to be performed in any order (except Assign must always be last), the above is the logical progression, and not following this order may disrupt the application status updates. For example, if subsequent steps are performed without adding the Vetting note, the status will still remain as Open . The Volunteer role is treated slightly differently than the other System Roles. The Onboarding Checklist will not be shown for this role, and it thus is not subject to the structured on-boarding flow described above. A cosaction.com email account is also not normally created for this role. NOTE: The Onboarding Checklist will only appear for applications submitted, or reopened, after May 6, 2019 (date that this feature was implemented).  Leadership Management Tool – Applicant Processing v1.1 5/8/19 3 Additional LMT Processing Details Notes At each appropriate step in the process, it is important to add detail notes describing each contact with the applicant, and other information relevant to the vetting and on-boarding process. This is critical both for your own recollection, but also for others who later may need to review or manage this leader. This is just as important for Rejected or Unassigned leaders as it is for new applicants, so that others will know whether a Former or Rejected leader should be eligible for reconsideration, should they reapply or express renewed interest. The available choices for the Contact Log notes are: Any action taken in the Role/Assignment Management section requires entry of a comment in the Reason field, which will be included in the automatic activity note. Notes added in LMT are role-specific, meaning that if someone has more than one role, the notes entered while processing the DC role for example, will only show when that is the selected role from the Applications History section on the left pane (click the role to select it). If another role is selected, such as FUT Member, the DC notes will not be displayed, only notes entered for the FUT Member role will show. This role-specific notes feature was added to LMT effective 3/14/2019, so any LMT activity notes entered prior to that date will be shown in the profile Dashboard, not LMT. The following reminder notation of this is displayed in the Notes and Comments section. Reopening Applications A System Role in Former or Rejected status may be reopened using the Reopen Application button in the Role/Assignment Management section, which places that application back into Open status. This starts the entire applicant process flow over again. Note however that the Assigned To name does not change automatically if a different leader reopens the application, though it may be changed with the Pickup the Process button once the application is in In Process or Onboarding status. When reopening an application, it is considered to be new , so the Onboarding Checklist feature will be applied, regardless of when the original application was submitted.  Leadership Management Tool – Applicant Processing v1.1 5/8/19 4 Missing Survey Responses With the current application flow on the Take Action page, no application should appear in LMT without responses to the survey questions, when applicable. However, when processing an older application, this could have been possible. Whenever an application is in Open , In Process , or Onboarding status, and there are no survey responses, the applicant can go to the Take Action page as though they were applying again, and they should immediately see the empty survey, which can then be completed and submitted. Once submitted, the responses will immediately be available on their LMT page for that role. Confirming cosaction.com Email Account The cosaction.com email account must be confirmed separately for each application being processed, by using the Send Confirm cosaction Email button to send the email. Any number of these emails may be sent, and they will all contain the same confirmation link, if for the same application. The link will remain valid until any one of them is clicked, after which it will expire, causing any subsequent clicks to present a 404 error page. Once confirmed, the Send Confirm cosaction Email button for that specific application will no longer be shown. 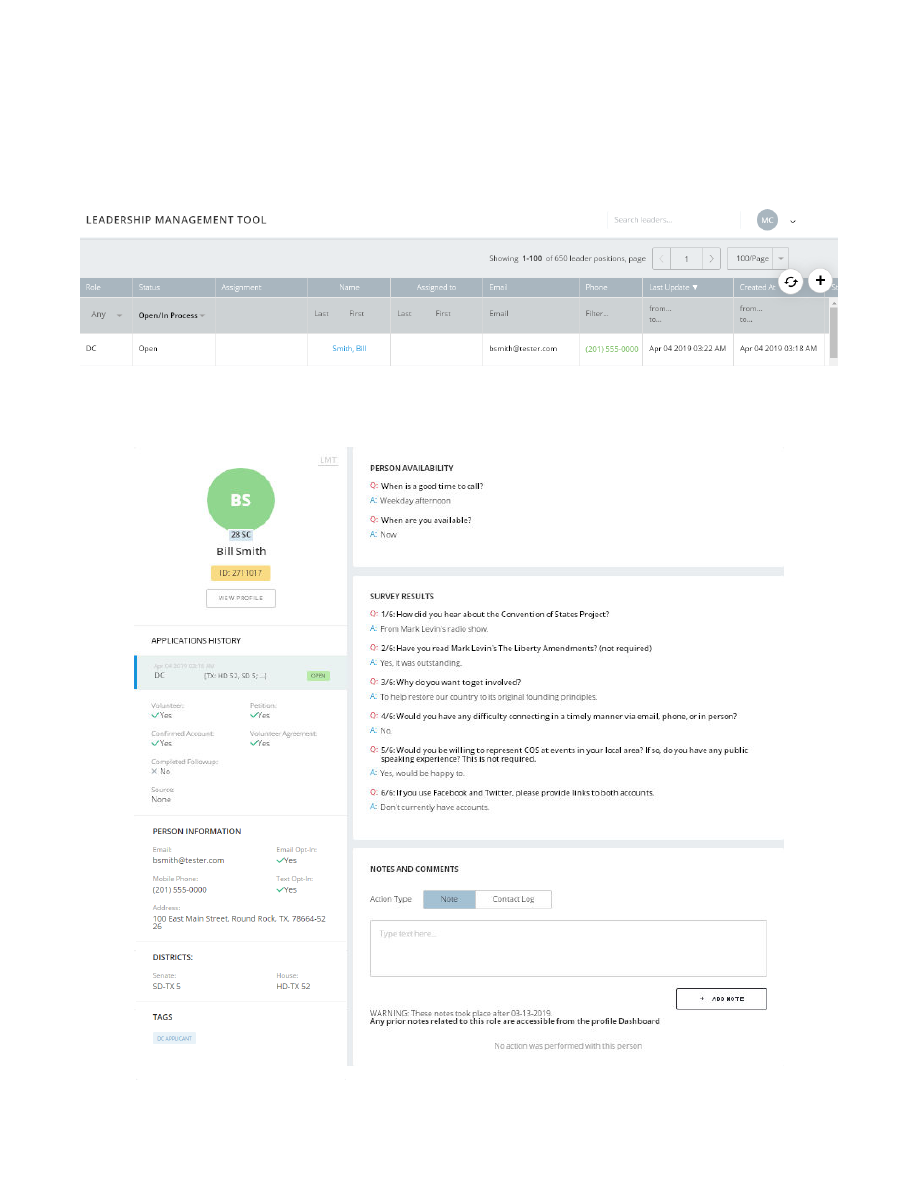 Leadership Management Tool – Applicant Processing v1.1 5/8/19 5 Illustrated Example of Normal Processing Flow Bill Smith has submitted his application for District Captain, which immediately appears in LMT in Open status. The LMT detail page, opened by clicking on the Name, shows Bill’s responses to the survey questions, along with selected information from his profile. 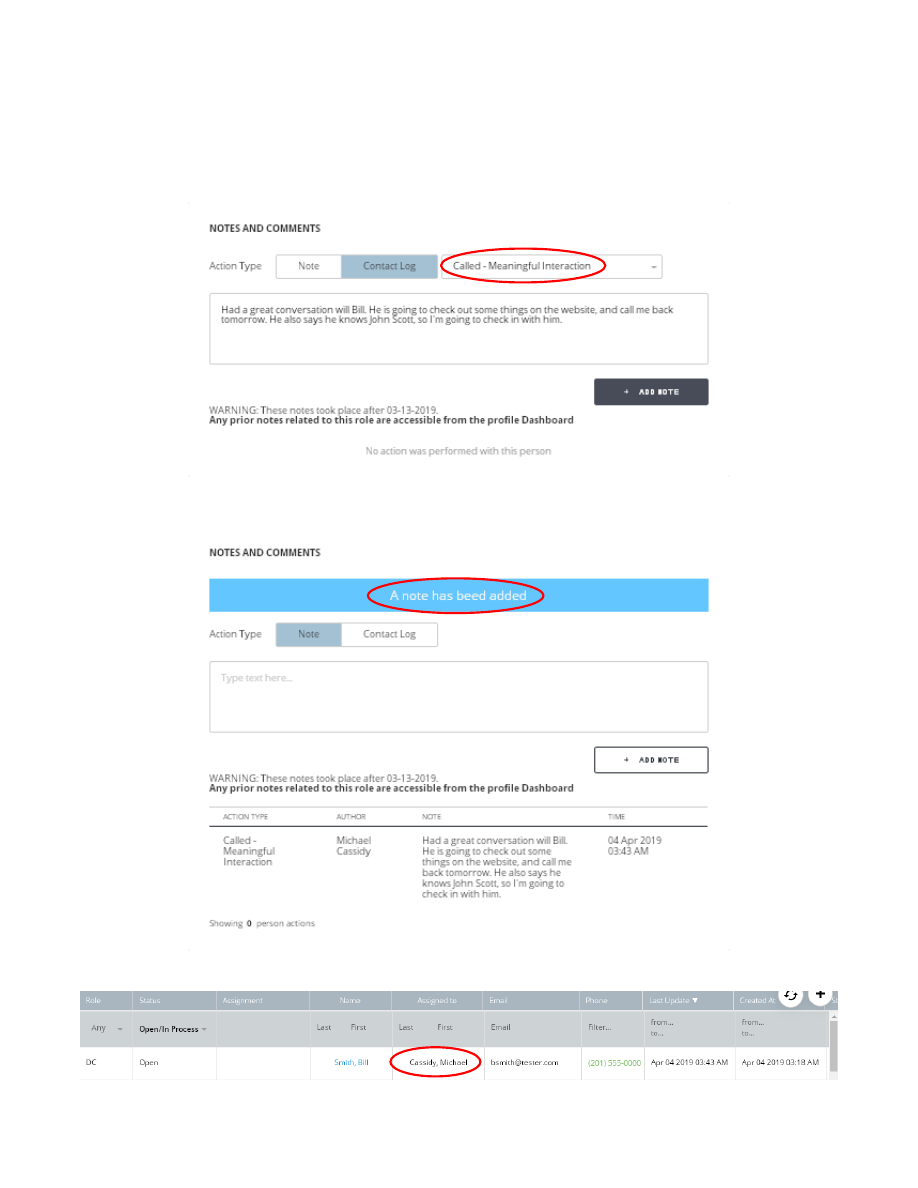 Leadership Management Tool – Applicant Processing v1.1 5/8/19 6 If Bill applied for more than one role, or had other current or previous roles, they will be shown in the Applications History section on the left pane, and clicking on another role will switch processing to that role. The first step is to give Bill a call to initiate the process. Once contact has been made, the Called – Meaningful Interaction note would be added, with detail comments about the conversation. After clicking on the Add Note button, a blue success message line will display for about 5 seconds, confirming the note has been added. After adding this note, I am now assigned as the leader processing the application, but it is still in Open status.  Leadership Management Tool – Applicant Processing v1.1 5/8/19 7 Adding this Called – Meaningful Interaction note automatically checks the Initial Call Made checklist item. Possibly at that same time, or maybe after further contact, it is decided that the vetting process should begin. This is signified in LMT by adding a Vetting note, which will change the status from Open to In Process . 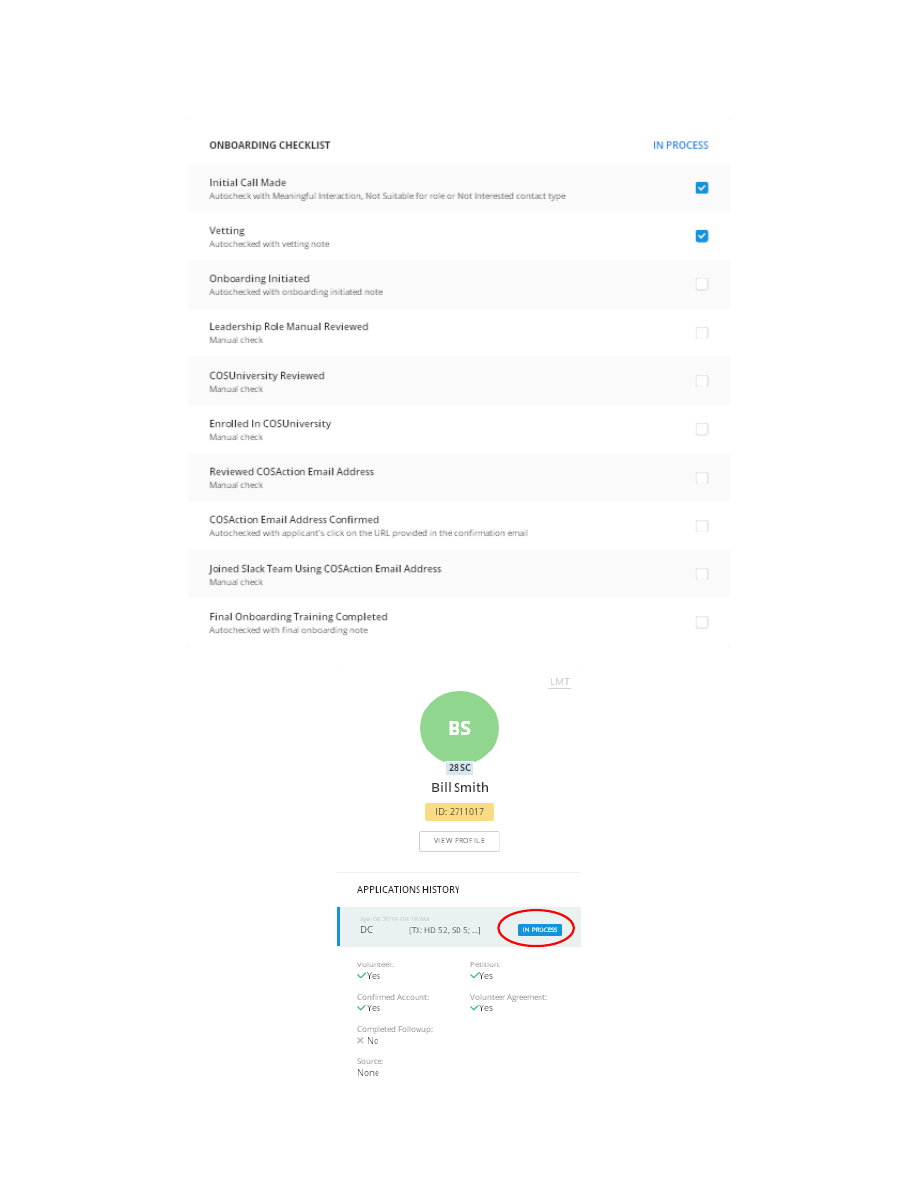 Leadership Management Tool – Applicant Processing v1.1 5/8/19 8 The Vetting checklist item is also auto-checked. The In Process status is also now shown on the left pane in the Applications History section.  Leadership Management Tool – Applicant Processing v1.1 5/8/19 9 At the point at which vetting has been completed for Bill and it is determined he should be on-boarded for the role, an Onboarding Initiated note is added, which also changes the status from In Process to Onboarding , and auto-checks the Onboarding Initiated checklist item. 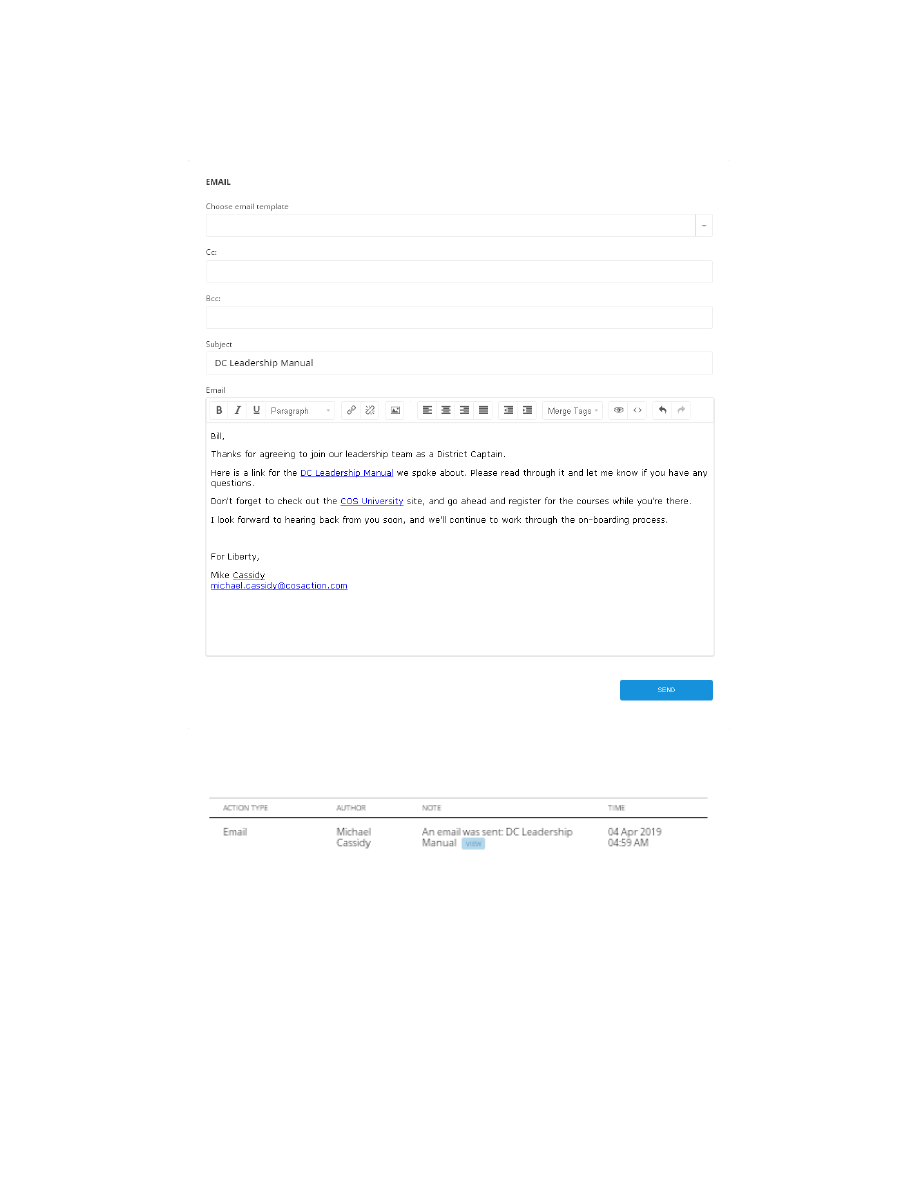 Leadership Management Tool – Applicant Processing v1.1 5/8/19 10 There are many steps needed during the on-boarding process, and this could span many days or weeks. One beginning step might be to send Bill an email with his leadership manual, and a reminder of next steps. Sending an email automatically adds an activity note, with a link to review the details of the email.  Leadership Management Tool – Applicant Processing v1.1 5/8/19 11 During the course of the on-boarding process, you may have many interactions with the applicant, and each should be documented with detail notes, with an appropriate Contact Log type. Notes which don’t fit into any of the available Contact Log choices may be entered using the Note button instead. As the on-boarding process winds down, that would be the appropriate time to create the cosaction.com email account. A forward-only account will be appropriate for most leaders, which is the default. If the applicant has more than one email address, be sure to determine which one they prefer to use for the forwarding, and select it from the list. Alternatively, the Forward only email option can be unchecked to create a full account, which exposes a password field where an initial password is specified. With a full account, the leader would normally access their email by signing into Zimbra, and they may change their password from there. However, if they ever lose track of their password and cannot sign in, a new password will need to be set from LMT for them – there is no means for them to reset the password themselves.  Leadership Management Tool – Applicant Processing v1.1 5/8/19 12 Bill will receive an email notifying him of his new cosaction.com email account. After creating the cosaction.com email account, two new options are now available, Delete and Send Confirm Email. Click on the Send Confirm Cosaction Email button to send an email Bill can use to confirm that he received it. The email he receives will look like this: 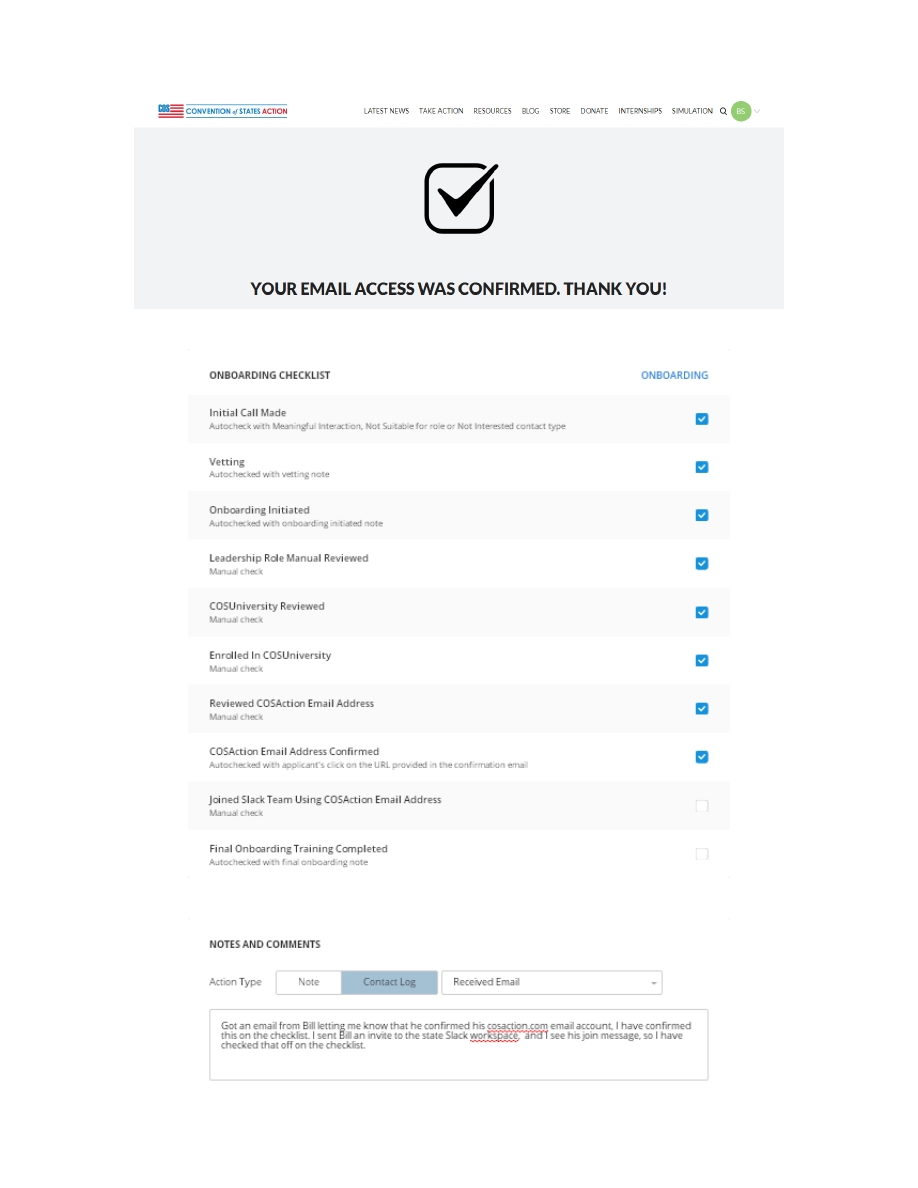 v1.1 5/8/19 13 After he clicks on the Confirm Access to Email link in the email, he will see the following confirmation: This will then automatically check the COSAction Email Address Confirmed item on the checklist. You’ll want to be checking in periodically to see if the email account has been confirmed, and follow up accordingly. You probably would want to ask Bill to let you know when he’s done that. 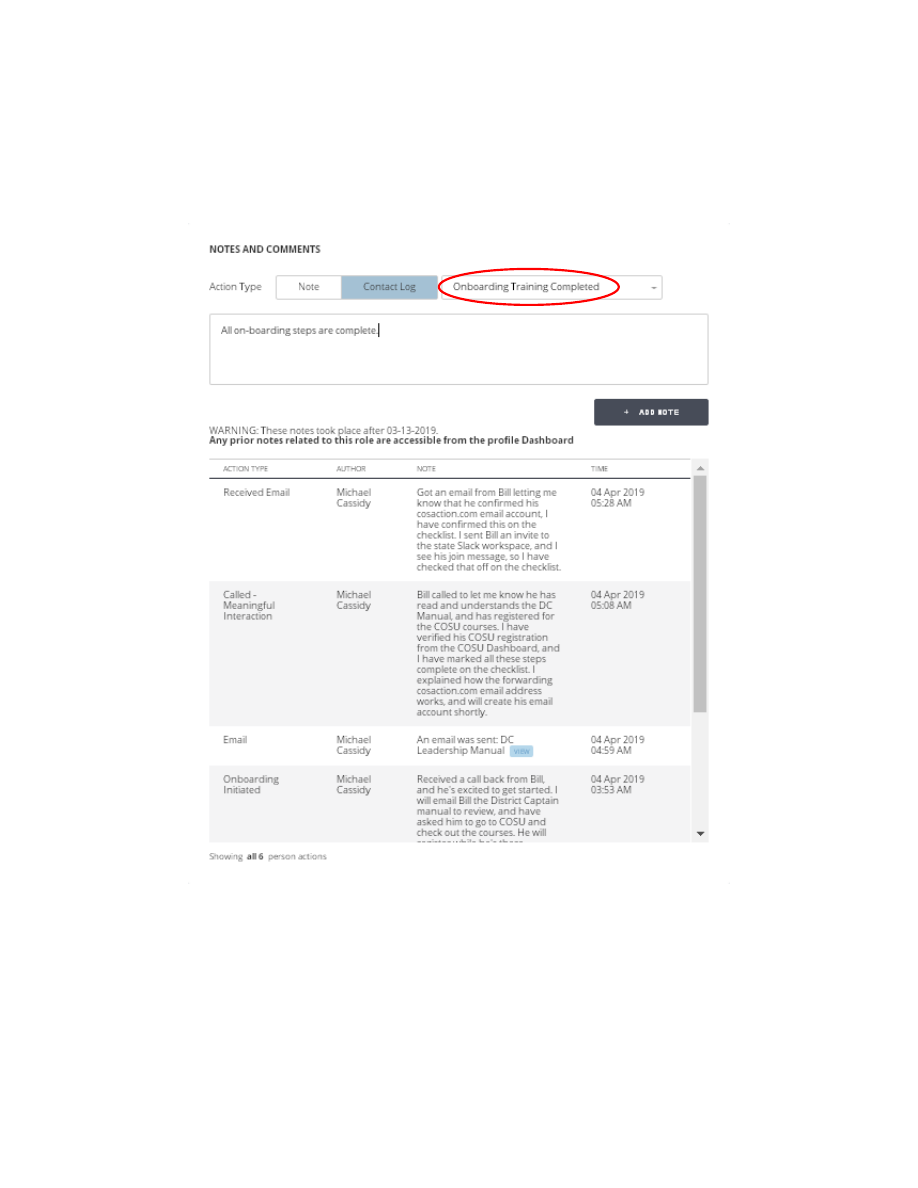 Leadership Management Tool – Applicant Processing v1.1 5/8/19 14 At this point, you’ll want to invite Bill to the state’s Slack workspace, using his cosaction.com email address. Once you’ve confirmed he’s joined, check off the Joined Slack Team Using COSAction Email Address item on the checklist. This generally will complete the on-boarding steps, so you conclude by adding an Onboarding Training Completed note, which will auto-check the Final Onboarding Training Completed checklist item. This will then complete all the checklist items, and the Assign button will be available in the Role/Assignment Management section. 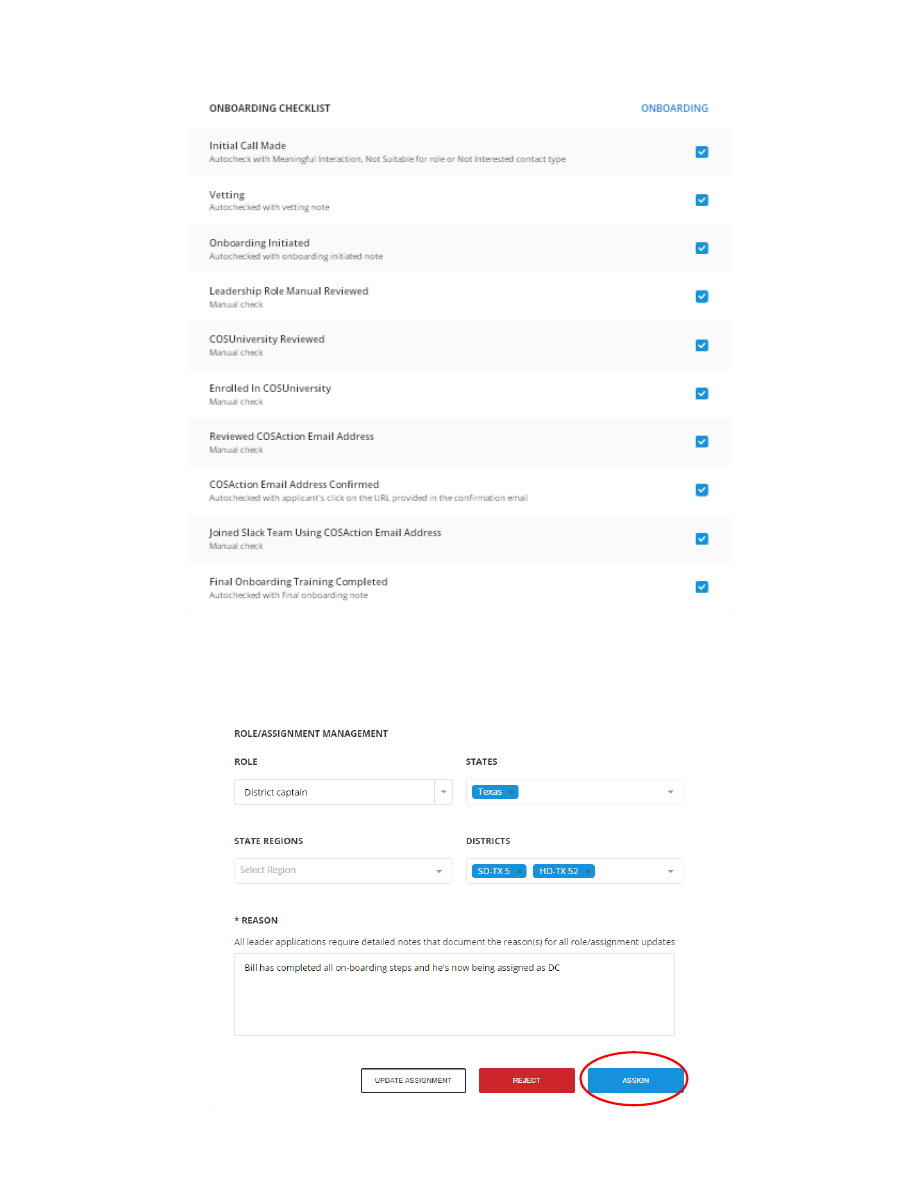 Leadership Management Tool – Applicant Processing v1.1 5/8/19 15 Bill is now ready to be assigned to his new role. If the district assignments need to be revised, this would be the time to do that, and if you prefer to assign him to the District Leadership Team role rather than the District Captain role, that can be changed now as well. Enter a comment in the Reason field, then click the Assign button, and the process is then complete. Be sure to communicate to Bill that he is now an assigned DC, and welcome him to the team. 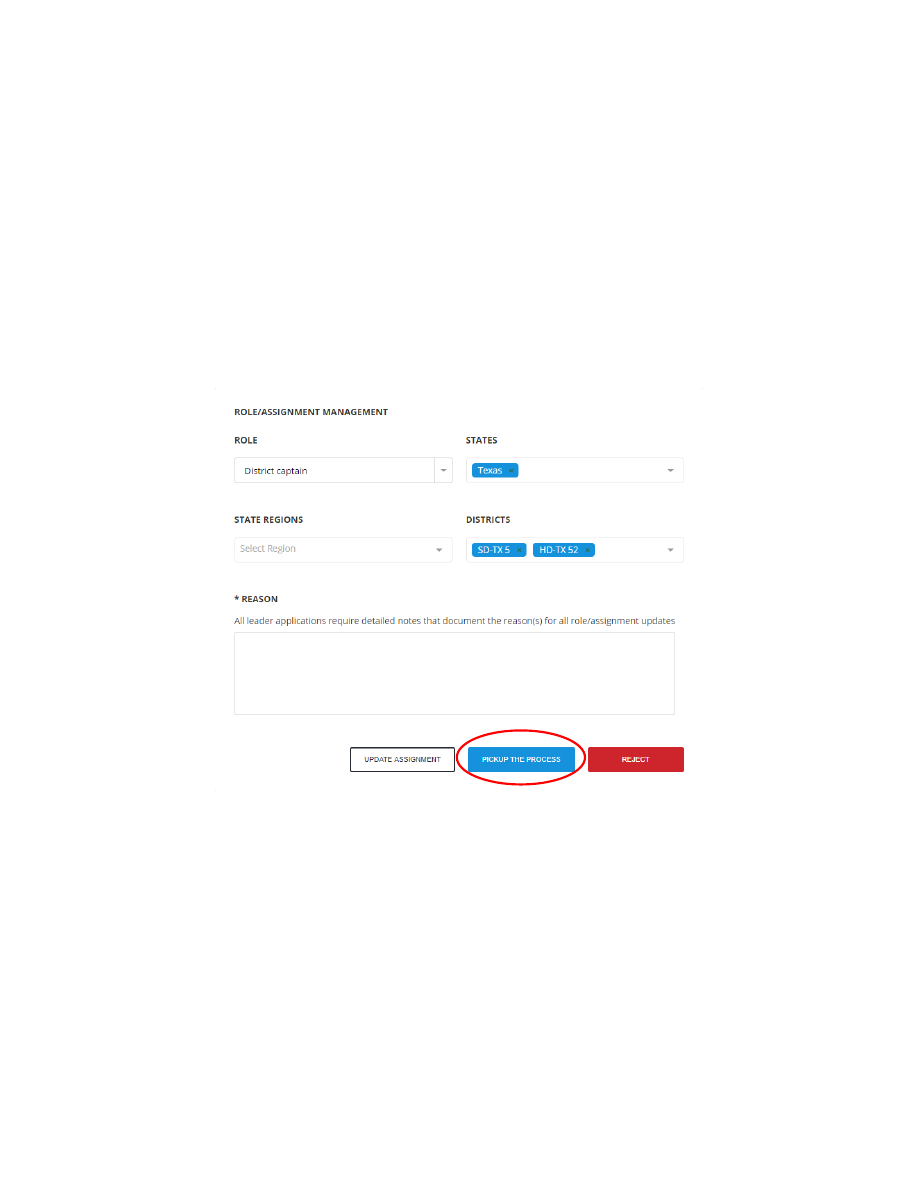 Leadership Management Tool – Applicant Processing v1.1 5/8/19 16 Assigned To Leader Throughout the process, multiple leaders may participate by entering notes, and even Rejecting or Assigning the role, but the application is automatically assigned to the leader who entered the first Contact Log note (shown in the Assigned to column of the LMT list). All notes will reflect the leader who entered them as the Author, but the assigned leader for the application does not change. However, if at any time while the application is in In Process or Onboarding status another leader desires to be shown as the assigned leader, they may use the Pickup the Process button in the Role/Assignment Management section. After doing so, the button will no longer be displayed, since that current leader is the assigned leader at that point, but the button will continue to appear for any other leaders. The purpose of having an assigned leader is merely to let others know which leader is taking primary responsibility for processing the application. Generally the assigned leader should be the one who takes the Reject or Assign action.  Leadership Management Tool – Applicant Processing v1.1 5/8/19 17 Unassign and Reopen After assigning Bill’s role, the Role/Assignment Management section then shows the Unassign button in place of Assign . When a System Role has been Unassigned or Rejected , the Reopen Application button is displayed, allowing for the process to start anew. |
| Page Metadata | |
| Login Required to view? | No |
| Created: | 2019-05-08 11:33 GMT |
| Updated: | 2021-02-24 10:25 GMT |
| Published: | 2019-05-08 09:33 GMT |
| Converted: | 2025-11-11 12:13 GMT |
| Change Author: | Michael Cassidy |
| Credit Author: | |
public/cb_mirror/lmt_applicant_processing_pdf_files_8219.txt · Last modified: 2025/11/11 12:13 by 127.0.0.1