
To view this on the COS website, click here leaders-onboarding-guide
To download the pdf file from the COS website, click here CB-Tools-Leaders_On-boarding_Guide_v31_20210921_(1).pdf
Leaders Onboarding Guide
Attachment: 3800/CB-Tools-LeadersOn-boardingGuidev3120210921(1).pdf
|

CitizenBuilder: Leaders On-boarding
Guide
COS Technical Services
Version 3.1

CB: T
OOLS
: L
EADERS
O
N
-
BOARDING
G
UIDE
V
3.1 Sep
29, 2021
T
ABLE OF
C
ONTENTS
TABLE OF CONTENTS
**DOCUMENT REVISION HISTORY ....................................................................................................................... 4 \\ ****INTRODUCTION ........................................................................................................................................... 1 **
P
URPOSE OF THIS
G
UIDE .....................................................................................................................................................................................
1
P
REREQUISITES ........................................................................................................................................................................................
1
W
HEN TO DO THESE TASKS ....................................................................................................................................................................
1
**TASK 1: FIND AND EXAMINE OPEN APPLICATIONS IN THE LMT ................................................................... 2 \\ ****TASK 1: FIND AND EXAMINE OPEN APPLICATIONS IN THE LMT (CONTINUED) .............................................................. 3 \\ ****TASK 1: FIND AND EXAMINE OPEN APPLICATIONS IN THE LMT (CONTINUED) .............................................................. 4 \\ ****TASK 2: MAKE THE INITIAL CALL ..................................................................................................................... 5 \\ ****TASK 2: MAKE THE INITIAL CALL (CONTINUED) ............................................................................................. 6 \\ ****TASK 2: MAKE THE INITIAL CALL (CONTINUED) ............................................................................................. 7 \\ ****TASK 3: PERFORM THE VETTING PROCESS ................................................................................................... 8 \\ ****TASK 3: PERFORM THE VETTING PROCESS (CONTINUED) ........................................................................... 9 \\ ****TASK 4: CONDUCT THE ONBOARDING PROCESS ........................................................................................ 10 \\ ****TASK 4: CONDUCT THE ONBOARDING PROCESS (CONTINUED) ............................................................................................... 11 **
I
MPORTANT INFORMATION ABOUT ONBOARDING ............................................................................................................................
11
**TASK 5: FINALIZE ONBOARDING ACTIVITIES ............................................................................................... 12 \\ ****TASK 6: ASSIGN THE NEW ROLE .................................................................................................................... 13 \\ ****TASK 6: ASSIGN THE NEW ROLE (CONTINUED) ........................................................................................... 14 \\ ****TASK 7: CONFIRM VOLUNTEER AGREEMENT SIGNED ................................................................................ 15 \\ ****TASK 8: CREATE A COSACTION.COM EMAIL ACCOUNT ............................................................................. 16 \\ ****TASK 8: CREATE A COSACTION.COM EMAIL ACCOUNT (CONTINUED) ......................................................................... 17 \\ ****TASK 9: INVITE THE APPLICANT TO THE SLACK WORKSPACE ........................................................................... 18 \\ ****TASK 9: INVITE THE APPLICANT TO THE SLACK WORKSPACE (CONTINUED) ........................................................................ 19 \\ ****APPENDIX A: LINKS ............................................................................................................................................ 1 \\ ****APPENDIX B: HANDLING EXCEPTIONS & VARIATIONS ................................................................................. 1 **
O
VERVIEW .................................................................................................................................................................................................
1
M
ORE ABOUT THE
LMT ........................................................................................................................................ 1
//Additional Purpose ................................................................................................................................ 1 //
//The LMT List ......................................................................................................................................... 1 //
//Applications for the Volunteer Role ....................................................................................................... 1 //
R
EJECTING AN
A
PPLICATION ..............................................................................................................................................................................
1

CB: T
OOLS
: L
EADERS
O
N
-
BOARDING
G
UIDE
V
3.1 Sep
29, 2021
T
ABLE OF
C
ONTENTS
**APPENDIX B: HANDLING EXCEPTIONS & VARIATIONS (CONTINUED) ............................................................................. 2 **
U
NASSIGNING A
R
OLE .............................................................................................................................................................................
2
R
EOPENING AN
A
PPLICATION ................................................................................................................................................................
2
**APPENDIX B: HANDLING EXCEPTIONS & VARIATIONS (CONTINUED) ............................................................................. 3 **
C
HANGING THE
“A
SSIGNED TO
” L
EADER .............................................................................................................................................
3
M
ORE
A
BOUT
A
DDING
N
OTES ...............................................................................................................................................................
3
//Notes are Important .............................................................................................................................. 3 //
//Notes are Role-specific ......................................................................................................................... 3 //
A
VOIDING
D
UPLICATE
S
LACK
A
CCOUNTS ........................................................................................................................................................
3
**APPENDIX B: HANDLING EXCEPTIONS & VARIATIONS (CONTINUED) ............................................................................. 4 **
M
ORE ABOUT
A
SSIGNING
R
OLES
(
//SEE //
//T//
//ASK //
//8) ..................................................................................................... //
4
//General ................................................................................................................................................. 4 //
//DC & RC Roles ..................................................................................................................................... 4 //
//Single Leader ........................................................................................................................................ 4 //
W
HEN A
COSA
CTION
E
MAIL
A
CCOUNT
A
LREADY
E
XISTS ..........................................................................................................................
4
**APPENDIX C: SUGGESTED SUMMARY OF ONBOARDING TASKS ............................................................................................. 1 **

DOCUMENT REVISION HISTORY
CB: T
OOLS
: L
EADERS
O
N
-
BOARDING
G
UIDE
V
3. Sept 29, 2021
R
EVISION
H
ISTORY
Revision DATE
DESCRIPTION
CHANGED BY
1.2
05/15/2019 First draft of v1.2 completed and submitted for review
Judi Schade
1.2.1
5/17/2019
Second draft of v1.2, incorporating suggested changes from Anne
Aycock, Isaac Helland, and Mike Cassidy
• Added note about applications for volunteer roles on pg 1
• Fixed reference to Appendix (s/b B instead of A) in Task 2
Step 4c (pg 5) and added relevant verbiage in Appendix B
“Rejecting an Application” (pg B1)and “More about Adding
Notes” (pg B3)referring to Contact Log selections “Not
Suitable for Role” and “Not Interested”
• Fixed highlighting in Onboarding Checklist image on page 11
Task 4
• Added a statement in Task 6 Step 1 (pg 14) about using the
applicant’s cosaction.com email address for the Slack
invitation, and added a section in Appendix B “More about
Slack” (pg B3) that explains the reasons and ways to prevent
duplicates
• Revised the email example in Task 6 Step 3 to show the Help
Desk URL instead of CB as the starting point for accessing the
Slack Basics training video
• Added a statement in Task 8 Step 3 (page 17) about seeing
Appendix B for important additional information about
assigning roles and added that section into Appendix B using
Mike’s Slack posting of April 23
rd
Judi Schade
1.3
5/24/2019
Updated Appendix B on “When a COSAction.com Email Account
Already Exists” on another account
Anne Aycock
1.4
5/31/2019
Updated Task 4 with note on COSU
Anne Aycock
1.4.1
6/13/2019
Replaced graphic for LMT Open Applicant
Bud Cornwell
2.0
6/14/2019
• Added Revision Number Column to Revision History page
• Updated to reflect system changes CB-1731, CB-732
• Incorporated suggested changes from Ginny Rapini, Judd
Sloan, Bud Cornwell
Anne Aycock
2.1
6/21/2019
Added links for Training Manuals & CB COS University Students &
Courses
Anne Aycock
2.2
7/13/2019
Added Summary of Onboarding Tasks
Martin Nolan,
Anne Aycock
3.0
12/2/2020
Updated to reflect system changes to Onboarding Process
Martin Nolan
3.1
09/29/2021 Add Slack Playlist Link for introduction to Slack
Anne Aycock
Introduction
CB: T
OOLS
: L
EADERS
O
N
-
BOARDING
G
UIDE
V
3.1 Sep 29, 2021
1
Purpose of this
Guide
To process an applicant for a COS leadership role, you will use the
Leadership Management Tool
(LMT)
in
CitizenBuilder (CB)
.
Application processing
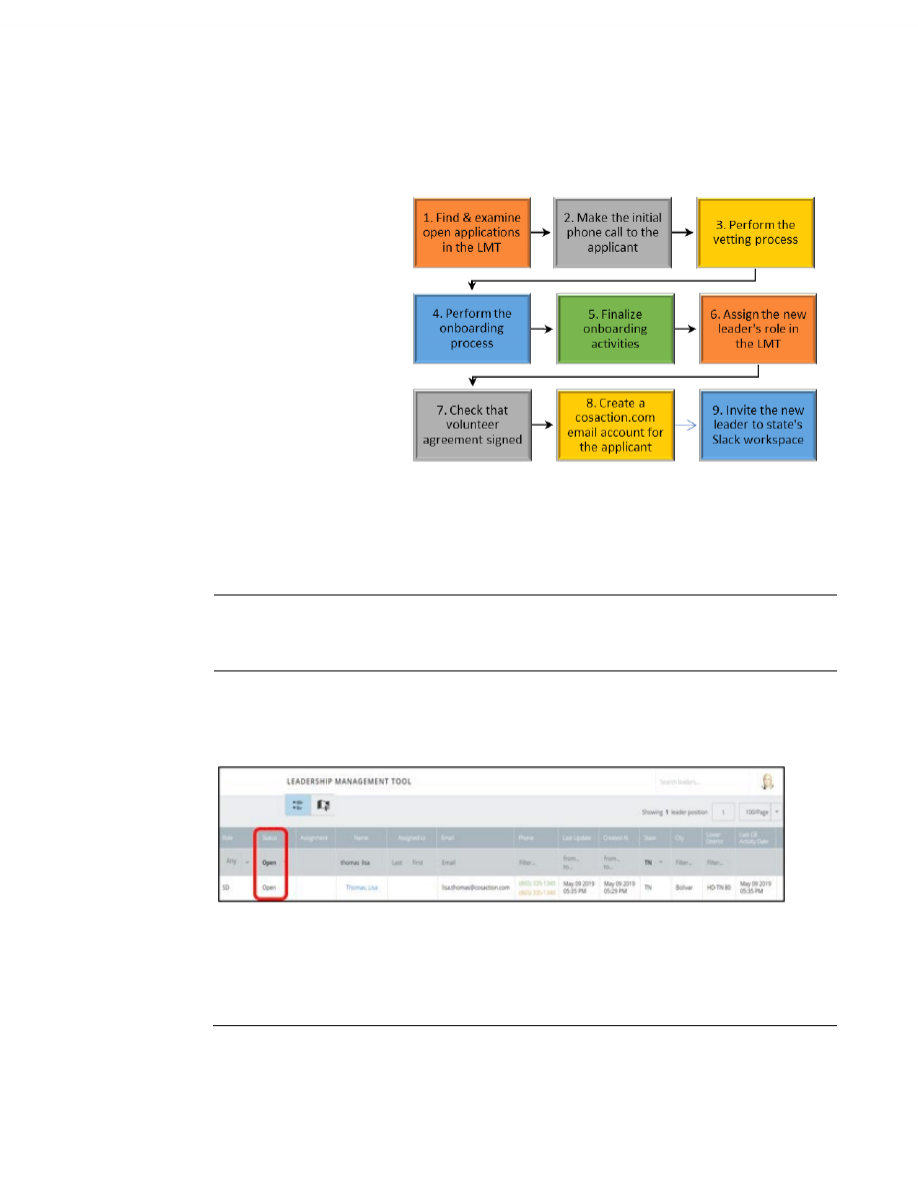
involves nine key tasks:
This guide explains how
to perform each sequential
task successfully.
IMPORTANT NOTES:
1. As an application moves through this nine-task process, the LMT performs automatic application status
updates. Although you can perform these nine tasks in any order, a different sequence could disrupt the
automatic updates, so please use this sequence for every application.
2.
Applications for Volunteer roles do not go through this process, so they do not trigger the Onboarding
Checklist you’ll learn about in Task 2.
Prerequisites
You should already be familiar with the basics of CB, including how to use the left navigation pane to
access system features and tools, and how to apply column filters to sort data.
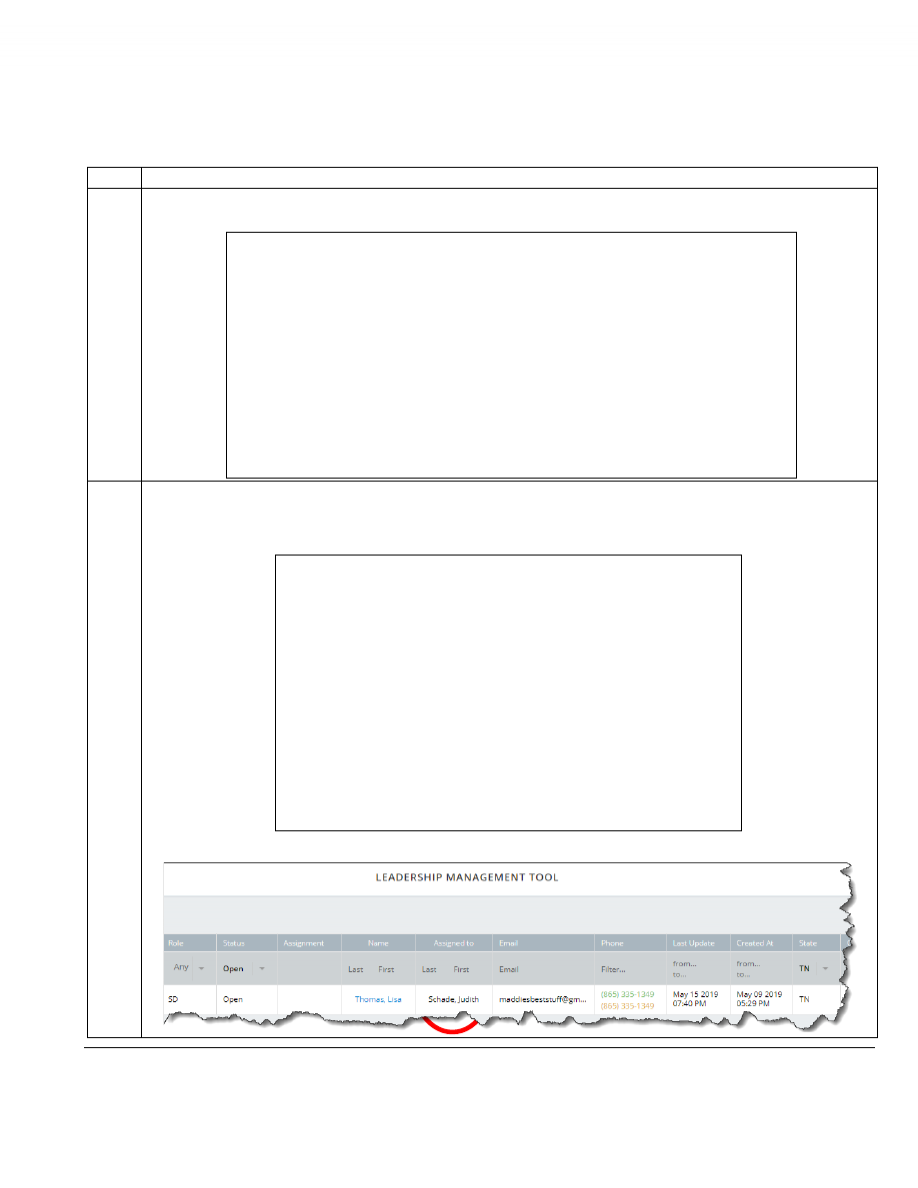
When to do
these tasks
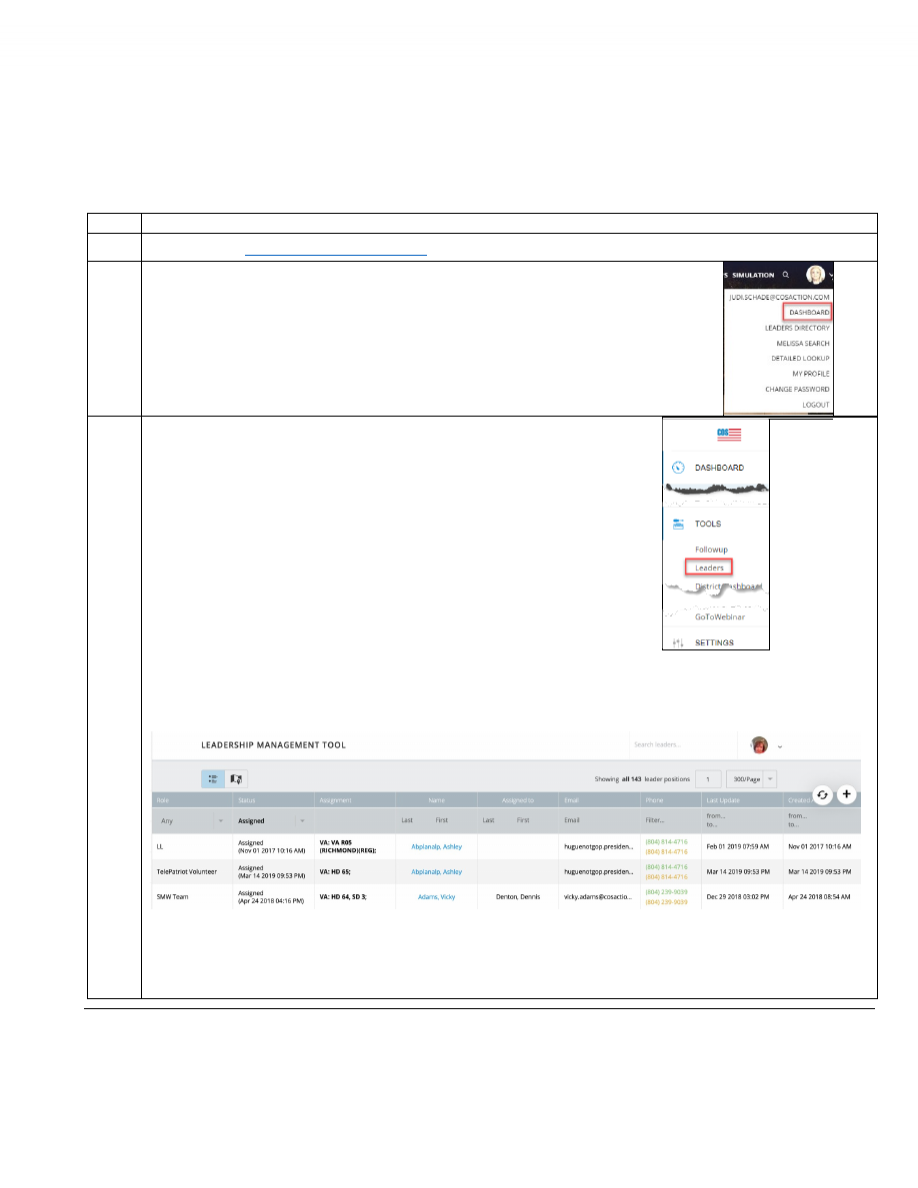
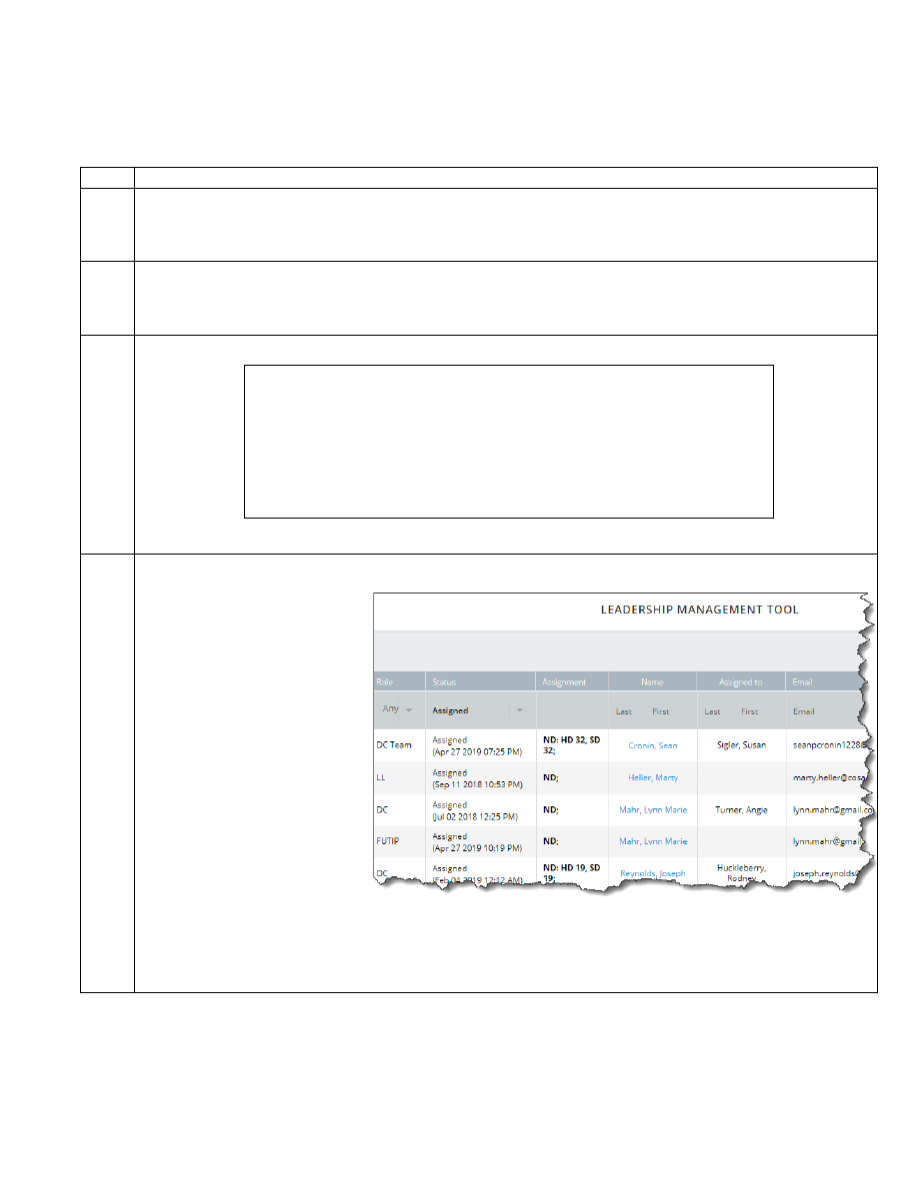
When a volunteer visits the
T
AKE
A
CTION
page of the COS website and submits an application for a
particular role, the application automatically creates a row in the LMT that looks like this:
This new application will have a status of
Open
.
When you find applications with the
Open
status in the LMT, that’s your signal to begin the process
described on the following pages.
Task 1: Find and Examine Open Applications in the LMT
CB: T
OOLS
: L
EADERS
O
N
-
BOARDING
G
UIDE
V
3.1 Sep
29, 2021
2
Introduction
This task covers the steps for finding the applications with the “Open” status in the LMT.
S
TEP
A
CTION
1
Log into CB at
https:%%//%%conventionofstates.com
.
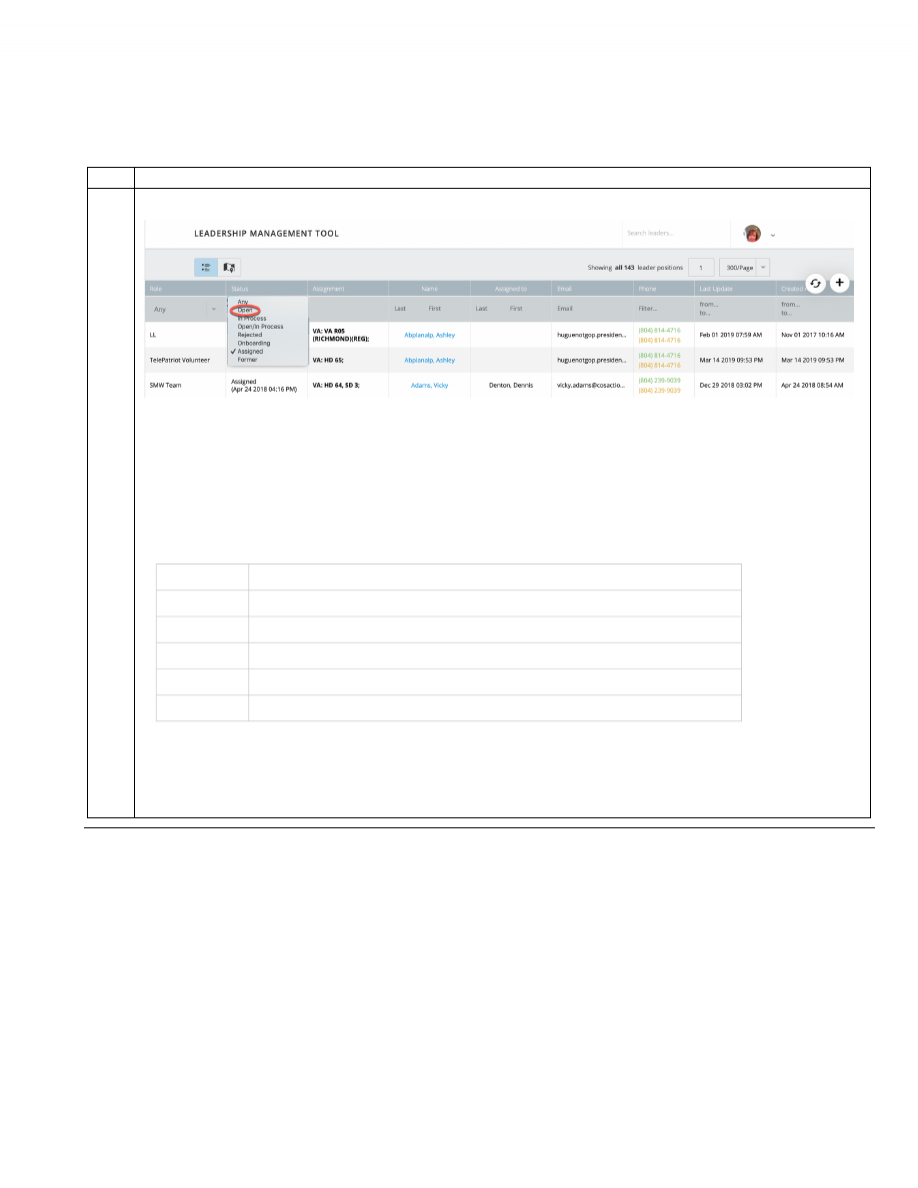
2
Open the dropdown list under your icon or photo at the top right of the screen
and select
DASHBOARD
.
Your CB dashboard will appear.
3
In the left navigation pane of your CB dashboard, select
TOOLS/Leaders
.
The LMT list of roles and assignments will appear, showing all currently assigned leaders.
This layout is the system default.
Continued on next page
Task 1: Find and Examine Open Applications in the LMT
(continued)
CB: T
OOLS
: L
EADERS
O
N
-
BOARDING
G
UIDE
V
3.1 Sep
29, 2021
3
S
TEP
A
CTION
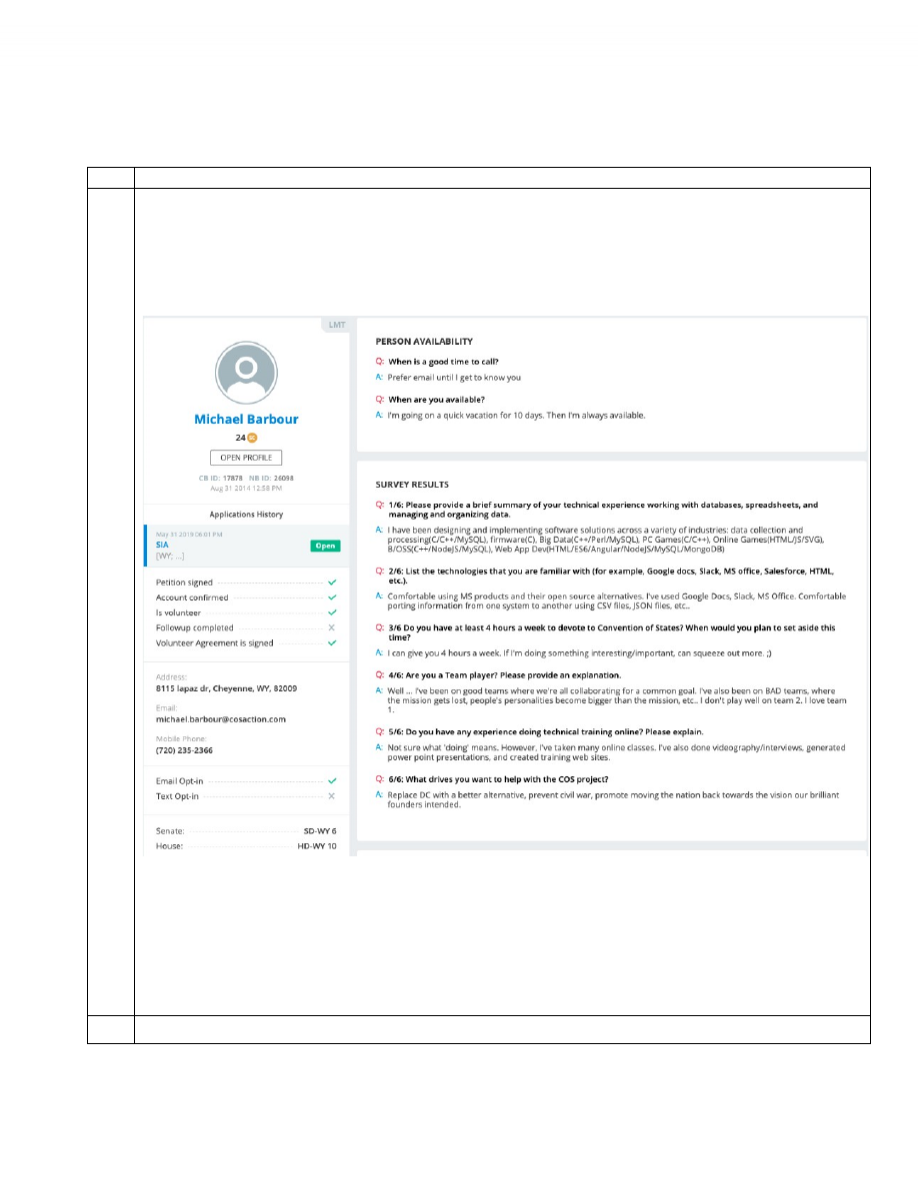
4
To find applications with the “
Open
” status, click the down arrow in the
Status
column and select
Open
.
Now you’ll see a list containing only the applications that are open.
Note:
You can also use filters in other columns to narrow down the list, e.g., by
State
and/or
Created At
date
range.
Here is a description of each status:
Open
New (or reopened) application that has not yet begun the vetting process
In Process
The vetting process has been started
Onboarding
Applicant has been vetted and is working through the on-boarding steps
Assigned
Active leader
Former
Previously
Assigned
, and has been
Unassigned
Rejected
Not assigned to the role (this also includes most Former leaders from NationBuilder)
The tasks explained in this guide move the applicant through the first four, from Open to Assigned.
Continued on next page
Task 1: Find and Examine Open Applications in the LMT
(continued)
CB: T
OOLS
: L
EADERS
O
N
-
BOARDING
G
UIDE
V
3.1 Sep
29, 2021
4
S
TEP
A
CTION
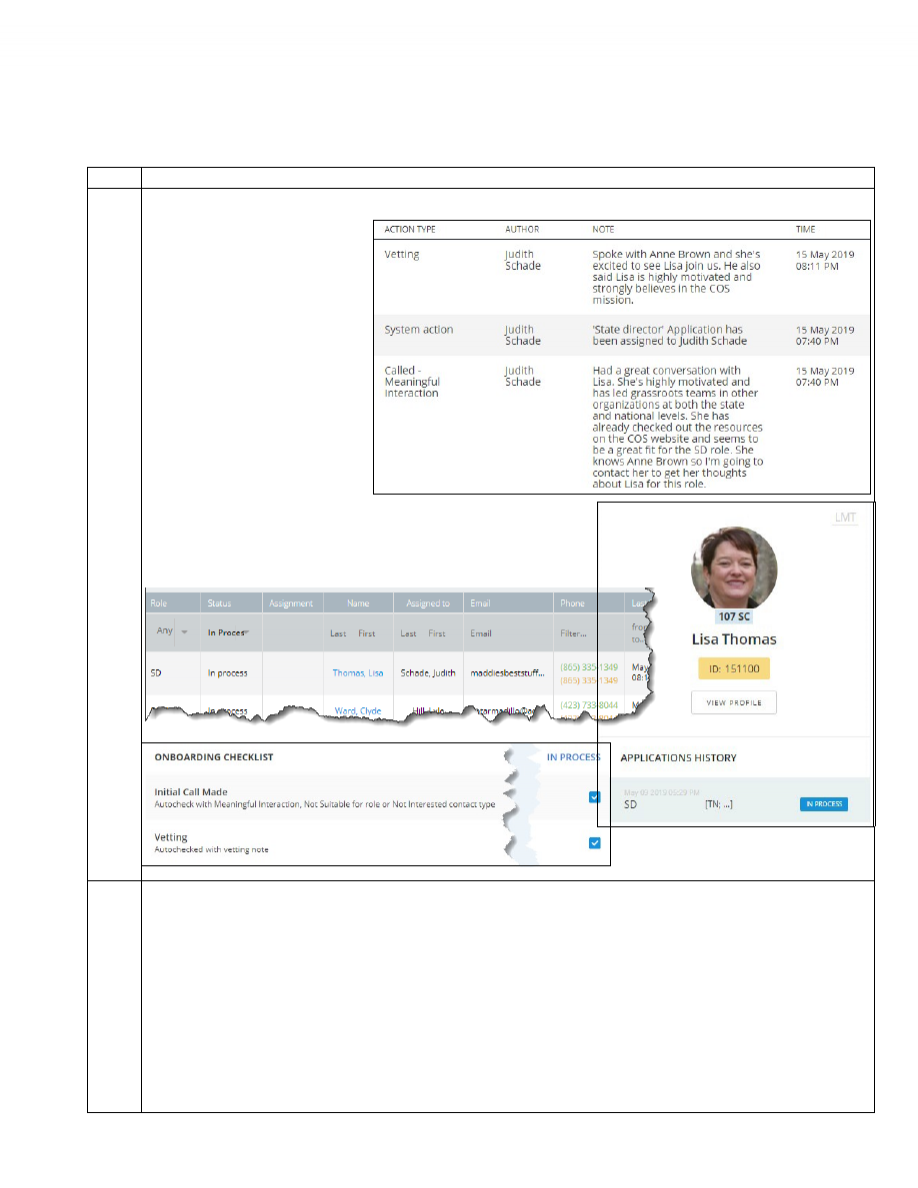
5
In the LMT list of
Open
applicants, click on an applicant’s name to see the LMT detail page showing the applicant’s
responses to the questions in the application, along with selected information from the CB profile in the left pane.
(
See image below.
) As you scroll down, you’ll see additional sections that we’ll address in subsequent tasks.
Note:
If the volunteer applied for more than one role, or has other current or previous roles, you will see those in the
APPLICATIONS HISTORY
section on the left. If you click on another role in APPLICATIONS HISTORY, you will see the
processing information for that role and can also perform processing tasks for that role.
6
Go to
Task 2: Make the Initial Call
.
Task 2: Make the Initial Call
CB: T
OOLS
: L
EADERS
O
N
-
BOARDING
G
UIDE
V
3.1 Sep
29, 2021
5
Introduction
This task covers the steps for contacting the applicant to initiate processing and for documenting that
activity in CB.
The steps below assume a meaningful interaction with the applicant during the first phone call and your
decision to continue the process. (
See
Appendix A
for additional details and how to handle exceptions
.)
S
TEP
A
CTION
1
Follow the steps in Task 1 to access the CB LMT detail page showing the applicant’s survey responses and profile
information so you’ll be ready to record your call activity.
If not already selected in
APPLICATIONS HISTORY
, click to select the
OPEN
role you want to begin processing.
2
Set your objectives for the outcome of your first conversation with the applicant by deciding what to discuss during
the call, such as missing survey responses, role requirements and expectations, training requirements for role,
applicant’s current level of motivation for role, etc.
A NOTE ABOUT MISSING SURVEY RESPONSES:
Whenever an application is in
Open
,
In Process
, or
Onboarding
status and there are no survey responses, the
applicant can go to the
Take Action
web page, select the role applied for, and then fill out the blank survey form.
As soon as the applicant submits the completed form, the responses will be available on the applicant’s LMT
page for that role.
3
Call the applicant and accomplish the objectives you set in Step 2.
4
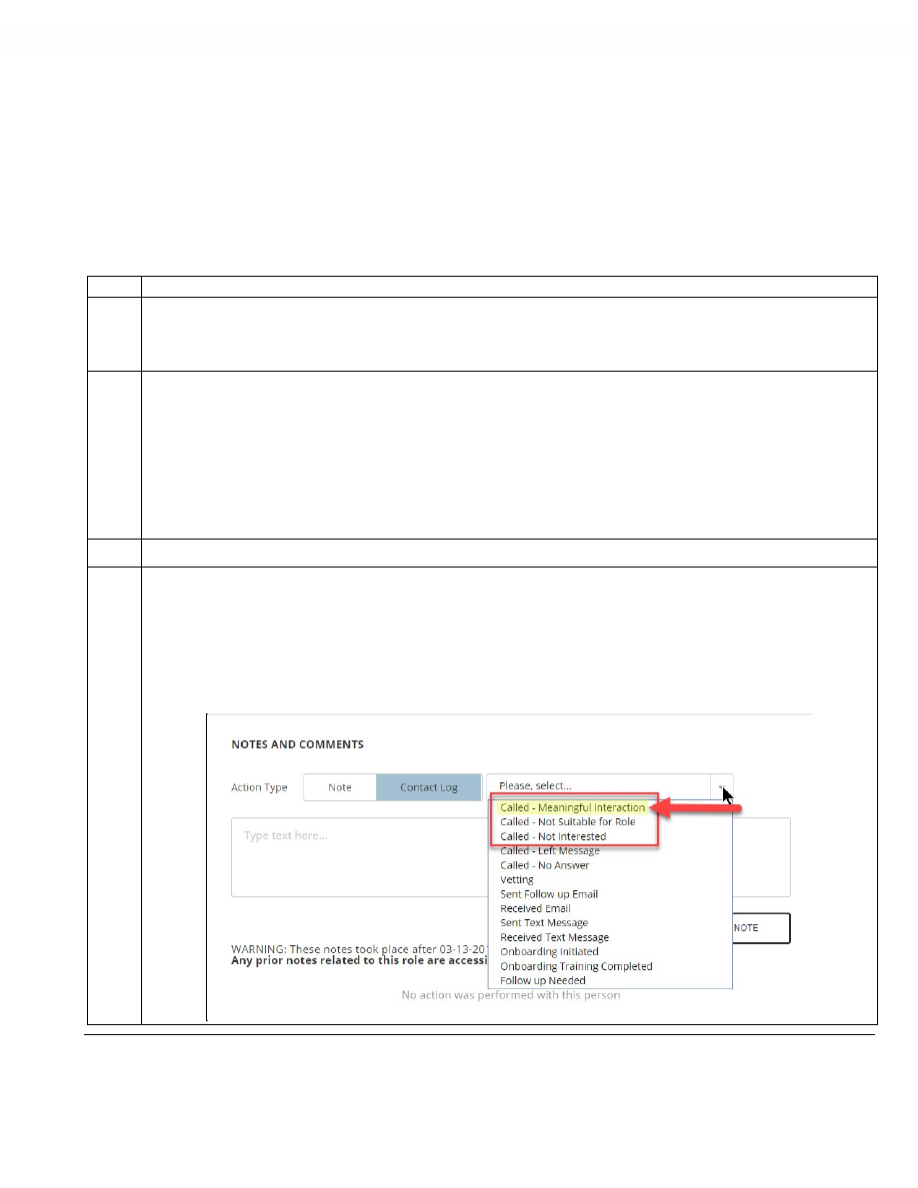
Record your call by entering a note in the LMT with these steps:
a. In the
NOTES AND COMMENTS
section, click
Contact Log
to reveal an additional field that shows “
Please,
select…
”
b. Click the down arrow to the right of the new field to reveal the list of selections.
c. Select “
Called – Meaningful Interaction
.” (
See
Appendix B “Rejecting an Application”
and
“More about
Adding Note”s
for information about “
Not Suitable for Role
” and “
Not Interested
” selections.
)
Continued on next page
Task 2: Make the Initial Call
(continued)
CB: T
OOLS
: L
EADERS
O
N
-
BOARDING
G
UIDE
V
3.1 Sep
29, 2021
6
S
TEP
A
CTION
5
Type the details of your conversation in the
NOTES AND COMMENTS
text field, making sure the information will also
make sense to others who might later need to review or manage this leader.
6
Click the
ADD NOTE
button.
A blue success message line will display for about five seconds, confirming your note has been added, and the note
will appear in an area at the bottom of the
NOTES AND COMMENTS
section with additional system-generated details.
The system leaves the application in
Open
status and assigns you as the leader processing it.
Continued on next page
Task 2: Make the Initial Call
(continued)
CB: T
OOLS
: L
EADERS
O
N
-
BOARDING
G
UIDE
V
3.1 Sep
29, 2021
7
S
TEP
A
CTION
7
Examine the
ONBOARDING CHECKLIST
that appears on the LMT detail screen below the
CREATE COSACTION EMAIL
ACCOUNT
section and notice that the system automatically checked “
Initial Call Made
.”
IMPORTANT NOTES
:
•
The
Onboarding Checklist
only appears for applications submitted or reopened after May 6, 2019 when this
feature was implemented.
•
The sequence in the checklist follows the recommended sequence of tasks in the process. As you proceed
through the process, some items in this checklist are automatically checked by CB and some require that you
manually enter a checkmark after completing that task.
8
Go to
Task 3: Perform the Vetting Process
.
Task 3: Perform the Vetting Process
CB: T
OOLS
: L
EADERS
O
N
-
BOARDING
G
UIDE
V
3.1 Sep
29, 2021
8
Introduction
The vetting process is intended to ensure the applicant and the role are a good fit. For some applicants,
you might accomplish this during the initial call and for others, you might choose to repeat this task with
additional vetting activities until you’re convinced you should proceed with onboarding. Additional
vetting activities might involve further interaction with the applicant and conversations with other
leaders who are familiar with the applicant.
This task covers the steps for recording all your vetting activities in the LMT.
S
TEP
A
CTION
1
Follow the steps in Task 1 to access the CB LMT detail page so you’ll be ready to record your vetting activity.
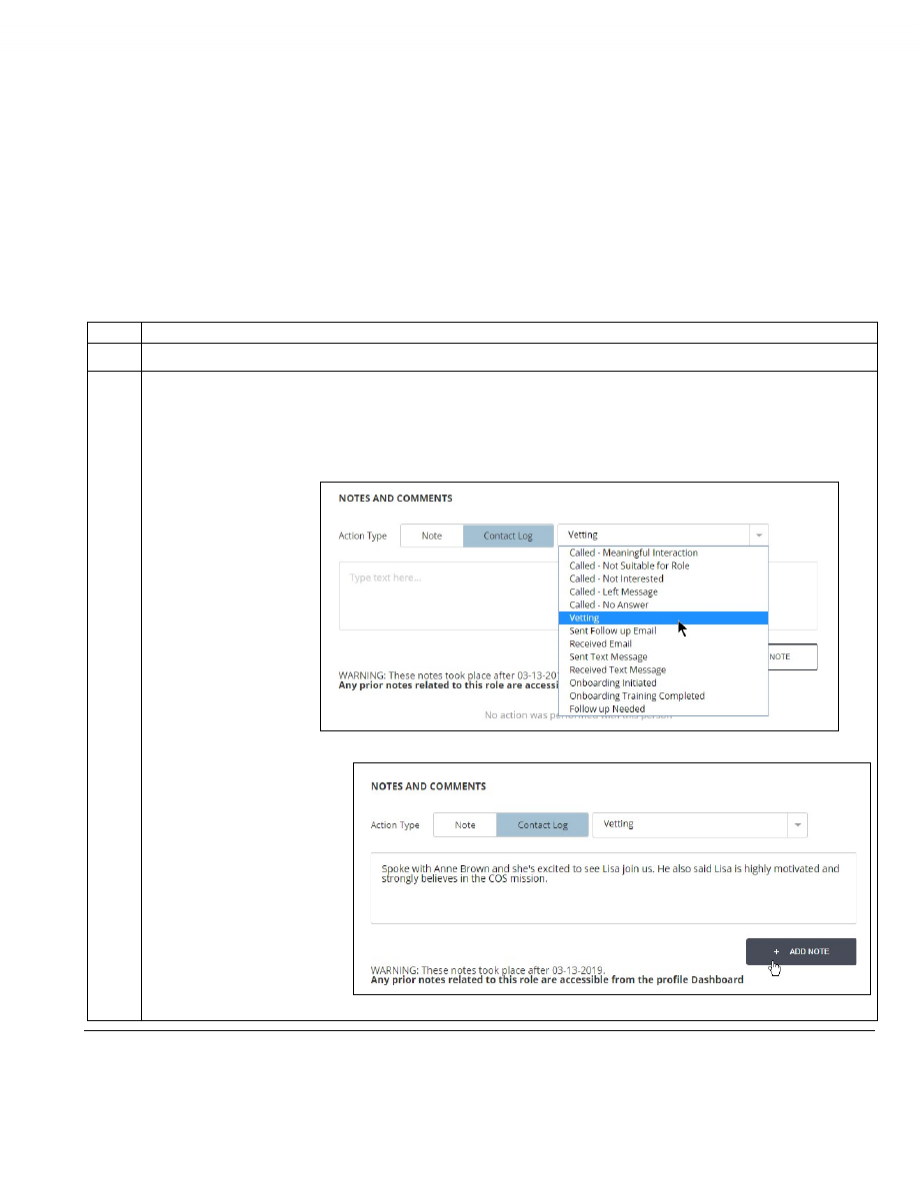
2
When you complete a vetting activity, record it by entering notes in CB with these steps:
a. In the
NOTES AND COMMENTS
section, click
Contact Log
to reveal the additional field that shows “
Please,
select…
”
b. Click the down arrow to the right of the new field to reveal the list of selections.
c. Select “
Vetting
.”
d. Type your note in the
text field and then click
the
ADD NOTE
button.
Continued on next page
Task 3: Perform the Vetting Process
(continued)
CB: T
OOLS
: L
EADERS
O
N
-
BOARDING
G
UIDE
V
3.1 Sep
29, 2021
9
S
TEP
A
CTION
3
Examine the result of adding your vetting note.
When you click
ADD NOTE
, the LMT
adds your note to the
NOTES AND
COMMENTS
section above any
previous notes and shows the
ACTION TYPE
as
Vetting
.
The LMT also automatically changes the status of the application from
“
Open
” to “
In Process
” in the
APPLICATIONS HISTORY
on the LMT detail
page and in the main LMT list. In addition, it adds a checkmark to the
Vetting
item on the
ONBOARDING CHECKLIST
.
4
When all vetting activities are complete and properly recorded, go to
Task 4: Conduct the Onboarding Process
.
Task 4: Conduct the Onboarding Process
CB: T
OOLS
: L
EADERS
O
N
-
BOARDING
G
UIDE
V
3.1 Sep
29, 2021
10
Introduction
This task covers the steps to follow when you have completed all your vetting activities and have
decided that the applicant should be onboarded for the role.
S
TEP
1
2
A
CTION
Follow the steps in Task 1 to access the CB LMT detail page.
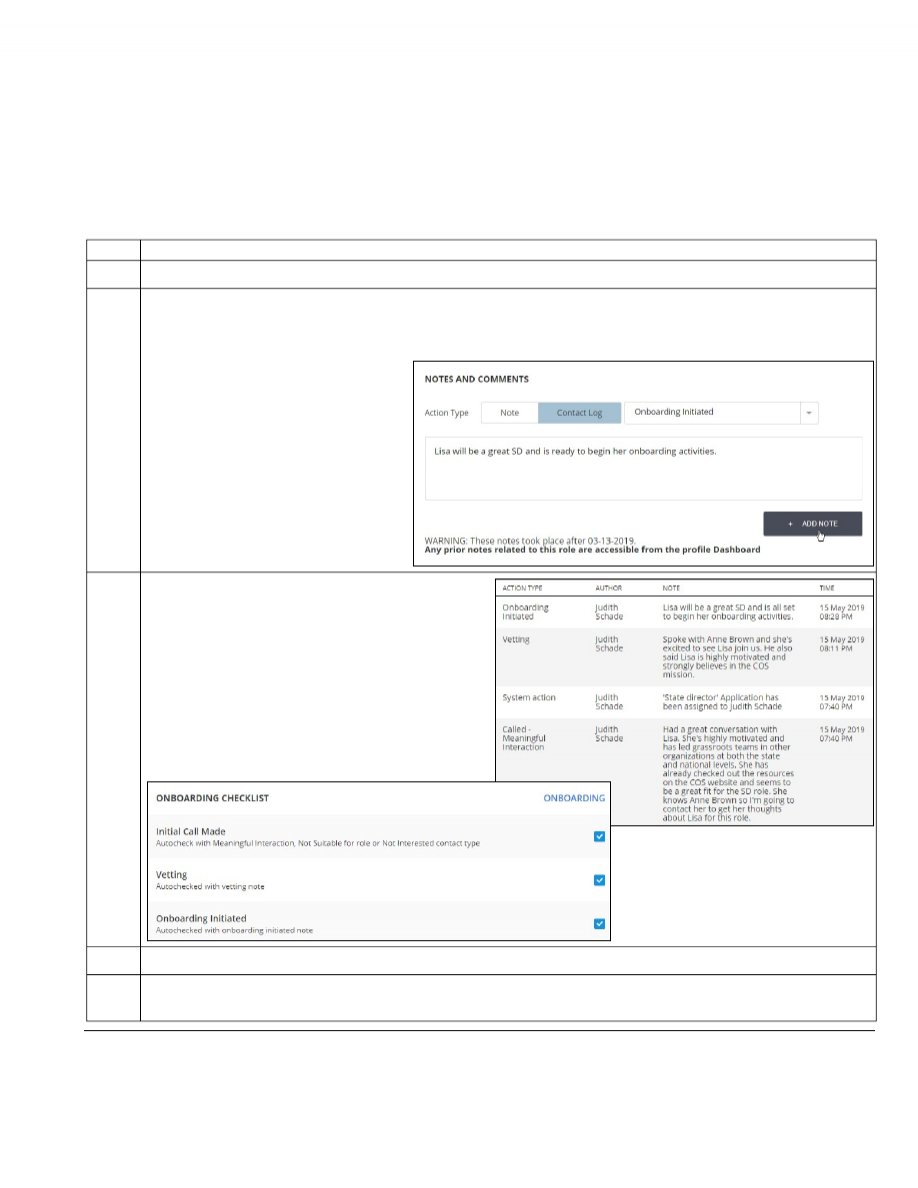
Perform these steps to enter a note indicating your intention to begin the onboarding process:
a. In the
NOTES AND COMMENTS
section, click
Contact Log
to reveal the additional field that shows “
Please,
select…
”
b. Click the down arrow to the right
of the selection field to reveal
the list of selections.
c. Select “
Onboarding Initiated
.”
d. Type your note in the text field
and click
ADD NOTE
.
3
Examine the result of adding your
Onboarding Initiated
note.
The LMT adds your note to the
NOTES AND COMMENTS
section with the
ACTION TYPE
as
Onboarding Initiated
.
The LMT also automatically changes the status of
the application from “
In Process
” to “
Onboarding
” in
the
APPLICATIONS HISTORY
on the LMT detail page
and in the main LMT list. In addition, it adds a
checkmark to the
Onboarding Initiated
item on the
ONBOARDING CHECKLIST.
4
Read the notes on the next page.
5
When the applicant completes the onboarding activities highlighted in the
ONBOARDING CHECKLIST
image on the
next page, go to
Task 5: Create a cosaction.com Email Account.
Continued on next page
Task 4: Conduct the Onboarding Process
(continued)
CB: T
OOLS
: L
EADERS
O
N
-
BOARDING
G
UIDE
V
3.1 Sep
29, 2021
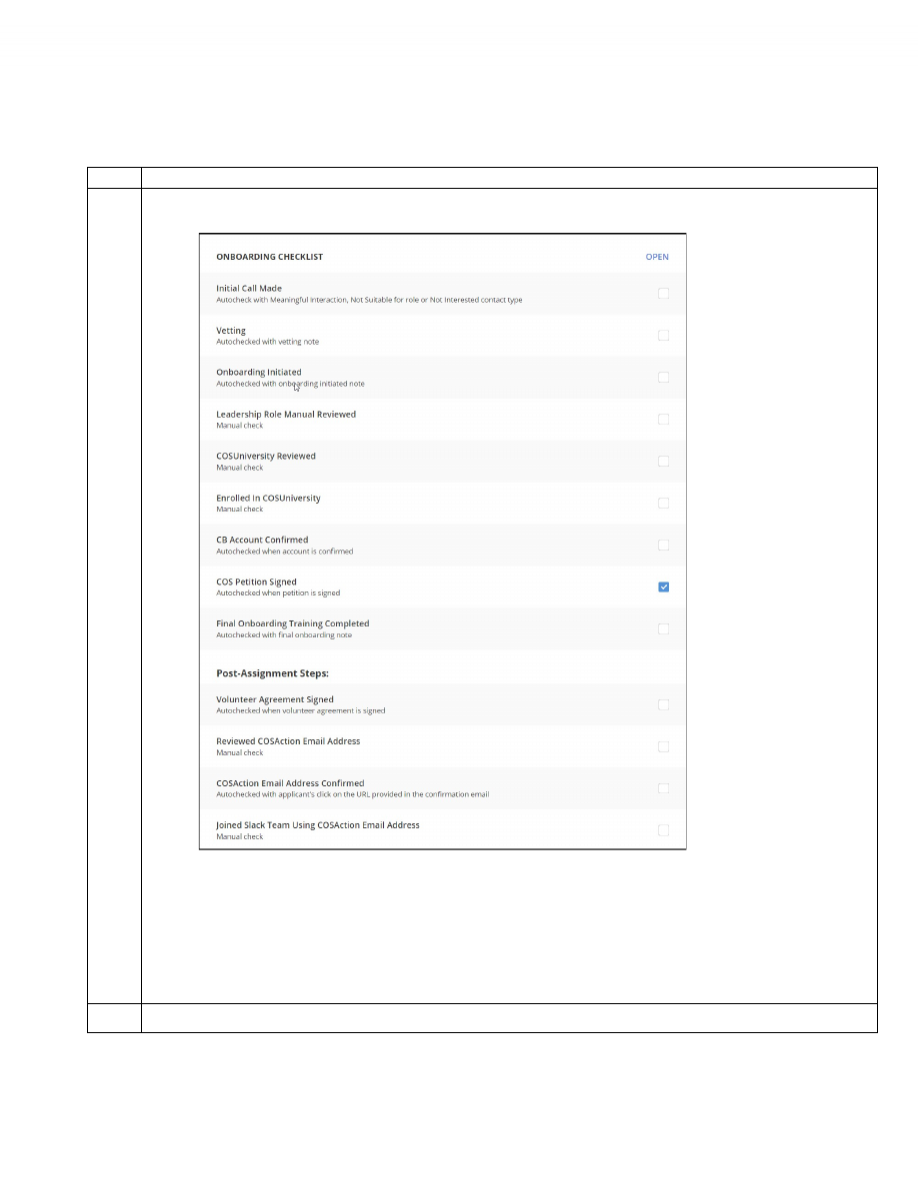
11
Important
information
about
onboarding
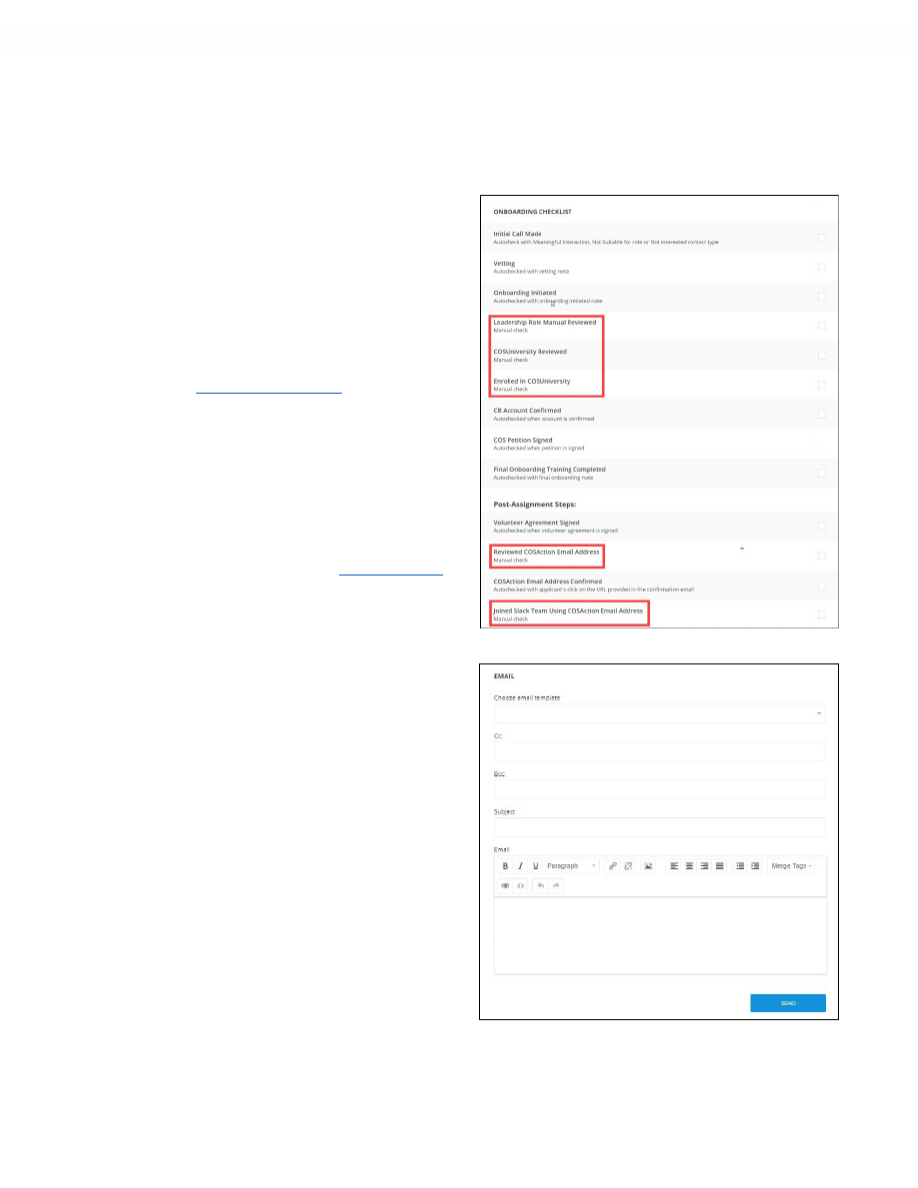
The onboarding process involves several steps as indicated in the
ONBOARDING CHECKLIST
below.
Notice that the highlighted items require
you to enter checkmarks manually as the
applicant completes these activities.
NOTE:
These activities could span several
days or even weeks, so you should have
regular interactions with the applicant
during this important time to ensure his or
her comfort and success in accomplishing
these tasks.
Leadership Role Manual
When applicants enroll in COSUniversity
before they are assigned to a role, they will
only see the public courses. They need to
complete the public courses. Students can
be viewed in CB under Tools:
COSUNIVERSITY: STUDENTS
More information on accessing
COSUniversity can be found in the Help
Desk Knowledgebase at
Accessing COSU
.
Make sure you record every interaction in
the
NOTES AND COMMENTS
section on the
LMT detail page. For a note with an
Action
Type
that doesn’t fit any of the
Contact
Log
choices in the dropdown list, simply use
the
Note
button instead.
To send email messages during
the onboarding process, use the
EMAIL
section on the LMT detail
screen.

Task 5: Finalize Onboarding Activities
CB: T
OOLS
: L
EADERS
O
N
-
BOARDING
G
UIDE
V
3.1 Sep
29, 2021
12
Introduction
When the applicant has completed all training and other onboarding requirements for the role, you can
conclude the onboarding process.
This task covers the steps for using the LMT to record the completion of onboarding.
S
TEP
A
CTION
1
Follow the steps in Task 1 to access the CB LMT detail page for the applicant.
2
In the
NOTES AND COMMENTS
section, click
Contact Log
.
3
Click the down arrow to the right of the “Please, select…” field and select
Onboarding Training Completed
.
4
Type a brief note in the text field and click the
ADD NOTE
button.
Adding this note triggers the system to add a checkmark to the final item on the
ONBOARDING CHECKLIST
.
The
ASSIGN
button also becomes available in the
ROLE/ASSIGNMENT MANAGEMENT
section, in readiness for the
next task.
5
Go to
Task 6: Assign the New Role
.
Task 6: Assign the New Role
CB: T
OOLS
: L
EADERS
O
N
-
BOARDING
G
UIDE
V
3.1 Sep
29, 2021
13
Introduction
This task includes the steps for assigning the volunteer’s new role in the LMT.
S
TEP
A
CTION
1
Follow the steps in Task 1 to access the CB LMT detail page for the applicant.
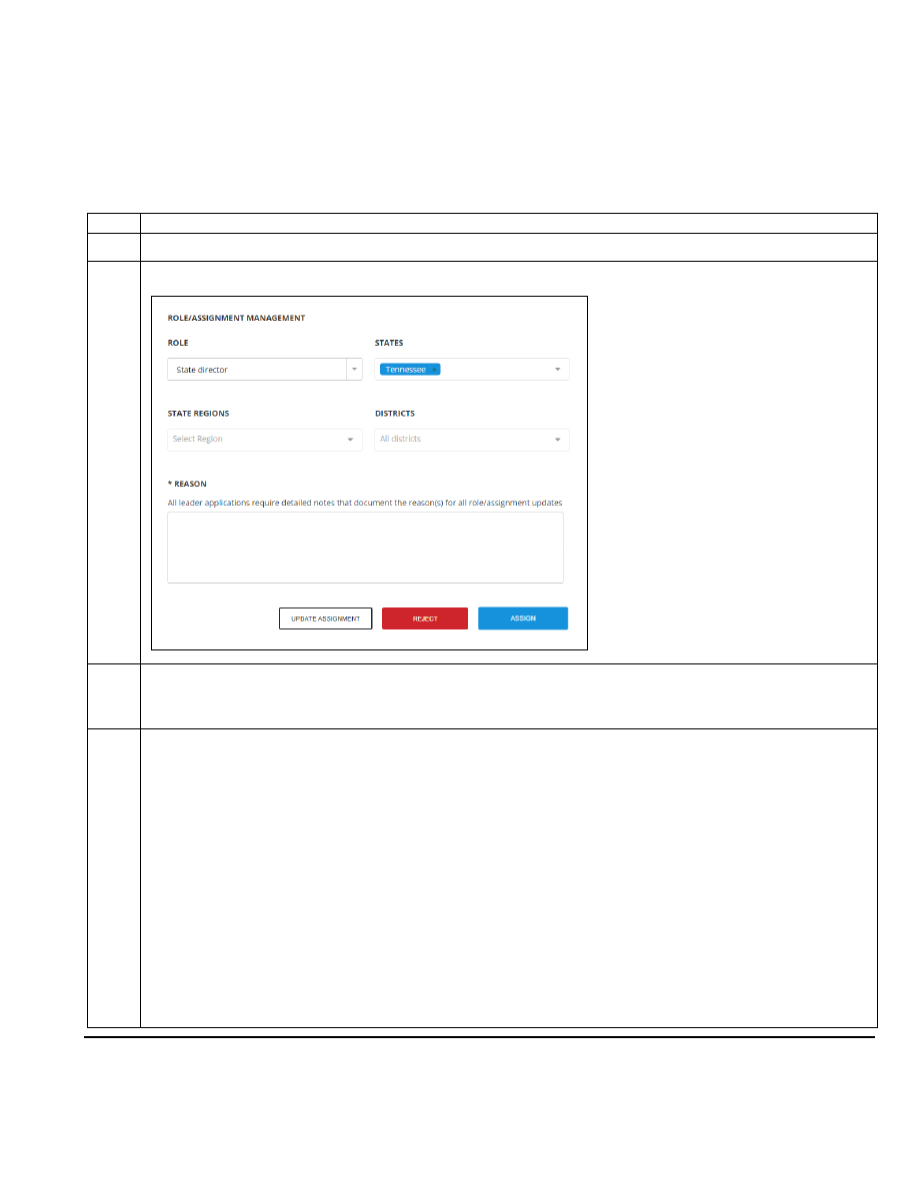
2
Scroll down and examine the
ROLE/ASSIGNMENT MANAGEMENT
section.
The
ROLE
and
STATES
fields are
automatically populated based on the
position applied for and the state in the
applicant’s address. Both fields are
changeable.
Only one role can be selected, but you can
select multiple states.
The available selections for
STATE
REGIONS
and
DISTRICTS
are controlled by
the states selected in the
STATES
field.
If you select more than one state, all the
regions and districts for each selected state
will appear in the dropdown lists in these
two fields.
3
Make sure the agreed-upon role appears in the
ROLE
field. If not, select another one from the available alternatives.
Note:
For some roles, there might be more than one choice. For example, for the State Director role, you can select the State
Director Leadership Team instead.
(SEE APPENDIX B FOR IMPORTANT ADDITIONAL INFORMATION ABOUT ASSIGNING ROLES.)
4
In the
STATES
field, if the new leader will support the state that already appears, move on to
Step 5
.
If the new leader will support a single
different state
, do this:
a. Deselect the state that appears by clicking the “
x
” to the right of the state name in the blue label.
b. Click the down arrow to the right of the
STATES
field and select the other state by clicking its name. A blue
label with the name of the selected state will appear in the
STATES
field.
c.
Click anywhere outside the list to close it.
d. Go to
Step 5
.
If the new leader will support
multiple states
, do this:
a. Click the down arrow to the right of the
STATES
field and select each of the other states by clicking each
state name in the dropdown list. As you select each state, its blue label will appear in the
STATES
field.
Note: The list will remain open while you make your selections.
b.
Click anywhere outside the list to close it.
c. Go to
Step 5
.
Continued on next page
Task 6: Assign the New Role
(continued)
CB: T
OOLS
: L
EADERS
O
N
-
BOARDING
G
UIDE
V
3.1 Sep
29, 2021
14
S
TEP
A
CTION
5
In the
STATE REGIONS
field, click the down arrow to the right of the field and select one or more regions to be
supported by the new leader.
Note:
The
STATE REGIONS
field and its dropdown list behave the same way as the STATES field.
6
In the
DISTRICTS
field, click the down arrow to the right of the field and select one or more districts to be supported by
the new leader.
Note:
The
DISTRICTS
field and its dropdown list behave the same way as the STATES and STATE REGIONS fields.
7
Type your comments in the
REASON
field.
IMPORTANT
: The system requires a note in the
REASON
field for any action you perform in this section.
8
Click the
ASSIGN
button to complete the process.
The LMT list changes to show the
Status
as
Assigned
, with the date
and time the assignment was done
and the states and districts to which
the leader is assigned.
IMPORTANT NOTE:
As soon as you complete this task, be sure to communicate to the new leader that he or she is now officially assigned
to the agreed-upon role. Include an official “Welcome to the team” statement.
Task 7: Confirm Volunteer Agreement Signed
CB: T
OOLS
: L
EADERS
O
N
-
BOARDING
G
UIDE
V
3.1 Sep
29, 2021
15
Introduction
This task consists of checking that the LMT added a checkmark to the Volunteer Agreement Signed step
in the Onboarding Checklist.
S
TEP
A
CTION
1
Follow the steps in Task 1 to access the CB LMT detail page for the applicant.
2
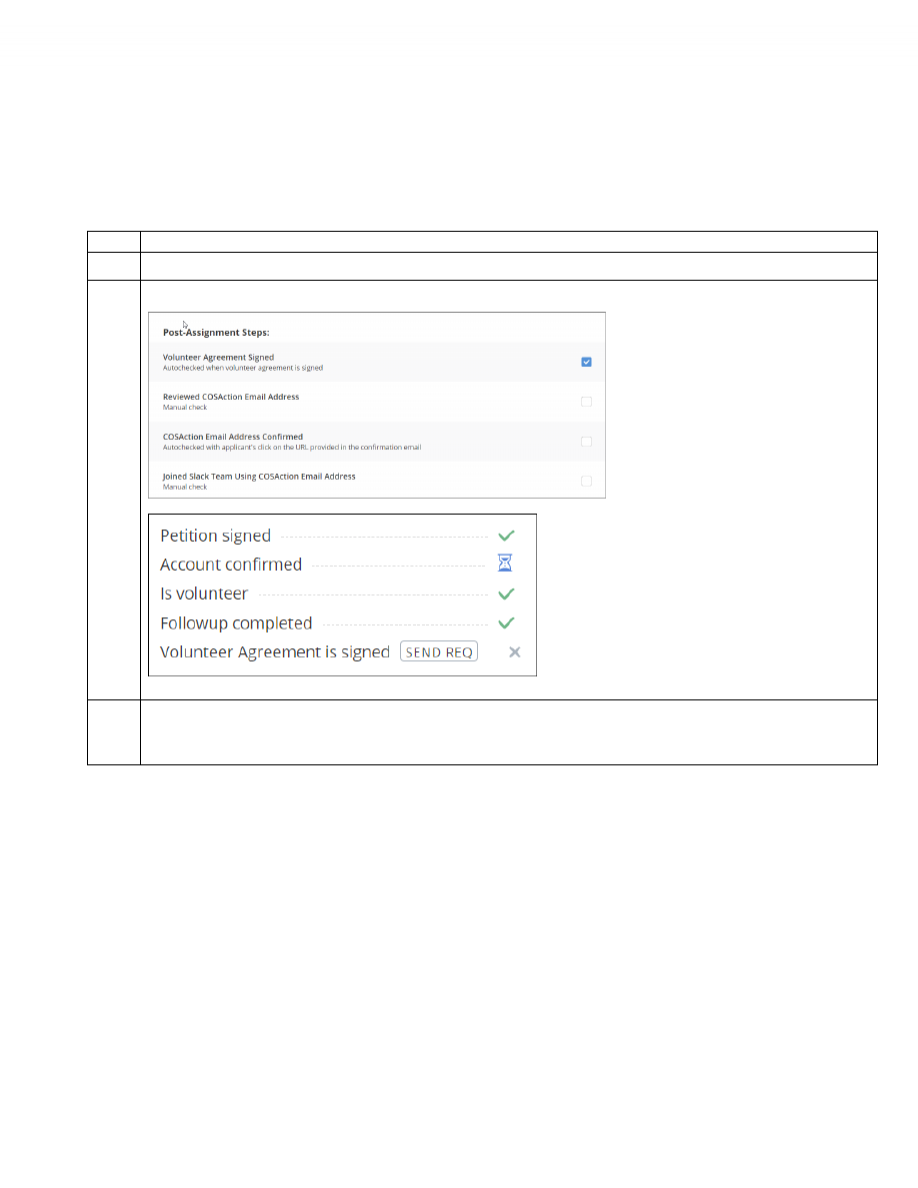
Scroll down and examine the
ONBOARDING CHECKLIST, Post-Assignment Steps
section.
An email with the Volunteer Agreement
link is now automatically triggered when
a role application is submitted. If the
applicant has not signed the agreement
when they try to sign into their CB
account for the first time, they will be
presented the Application to sign.
When the Volunteer Agreement has
been signed the LMT auto checks the
Volunteer Agreement Signed checkbox.
When the applicant has not signed the Volunteer
Agreement, a Send Request button will be shown
on the “Volunteer Agreement is signed” status line
below the Applications History on the LMT detail
screen along with an “x” (or an hourglass symbol if
a sent Volunteer Agreement is pending applicant
action).
3
If the applicant has not completed signing the Volunteer Agreement, have them complete an agreement that is in
process, send them a new agreement with the Send Req button, or have them attempt to sign in to their account to
trigger sending them a Volunteer Agreement for signature.
Task 8: Create a COSAction.com Email Account
CB: T
OOLS
: L
EADERS
O
N
-
BOARDING
G
UIDE
V
3.1 Sep
29, 2021
16
Introduction
As the onboarding process nears completion, it is time to create a cosaction.com email account for the
new leader.
Follow the steps below to create the new email account.
S
TEP
A
CTION
1
Follow the steps in Task 1 to access the CB LMT detail page for the applicant.
2
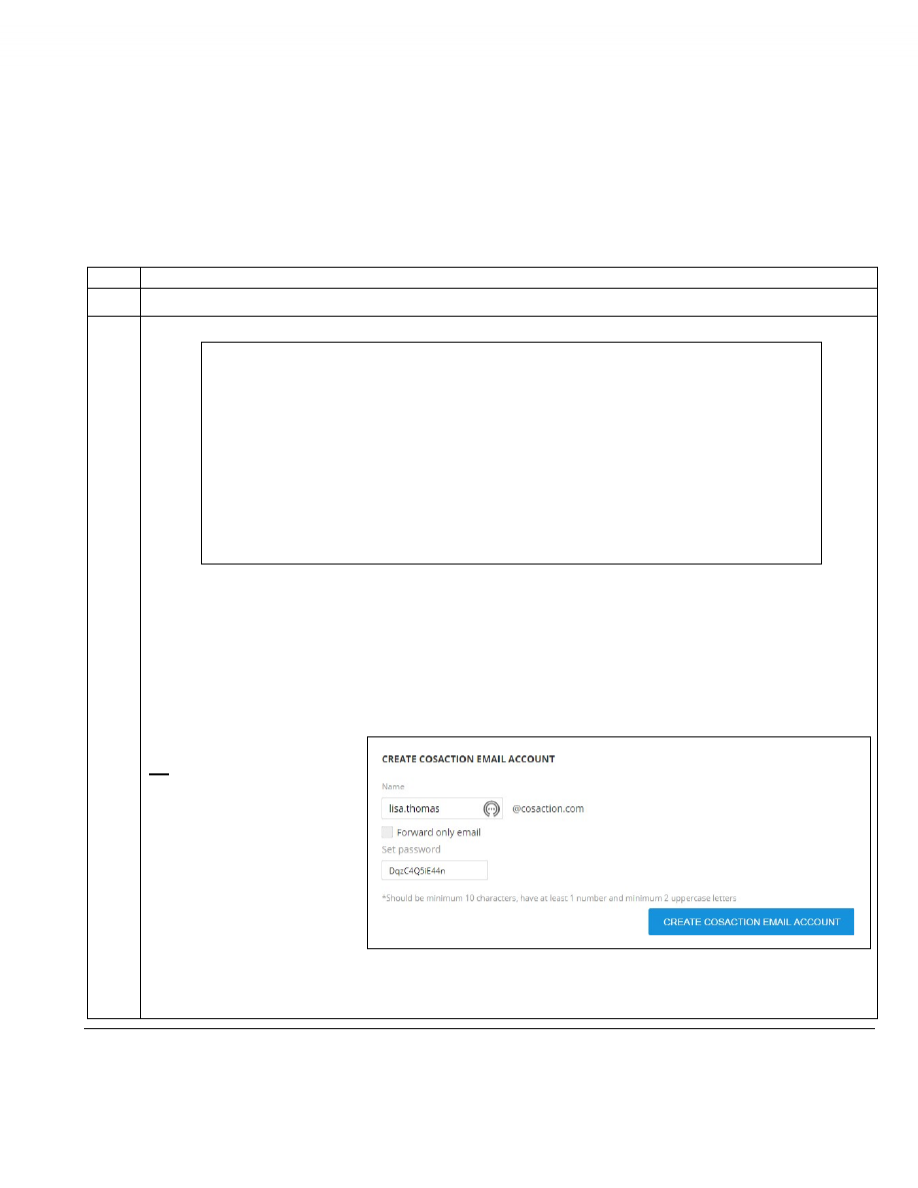
Go to the section entitled
CREATE COSACTION EMAIL ACCOUNT
.
As shown in the image above, the system uses the first and last name from the applicant’s profile in the address and
defaults to a
forward only
account going to the email address the applicant provided. This arrangement will be
appropriate for most leaders.
If there is more than one email address listed, ask the applicant which one he or she prefers for receiving COS
emails and select that one. (If the applicant prefers an email address that doesn’t appear, you can add the email
address in the applicant’s CB profile.)
IMPORTANT NOTE:
If the new leader needs to have a
full
account, you can deselect the
Forward only email
option,
exposing a password field where
an initial password is specified.
With a
full
account, leaders would
normally access email by signing
into Roundcube, COS’s online
email client, where they can
change the password. However, if
they forget the password and can’t
sign in, another leader would have to set a new password for them from the LMT. Leaders cannot reset their own
passwords.
(Note: There is separate training for Roundcube.)
Continued on next page
Task 8: Create a COSAction.com Email Account
(continued)
CB: T
OOLS
: L
EADERS
O
N
-
BOARDING
G
UIDE
V
3.1 Sep
29, 2021
17
S
TEP
A
CTION
3
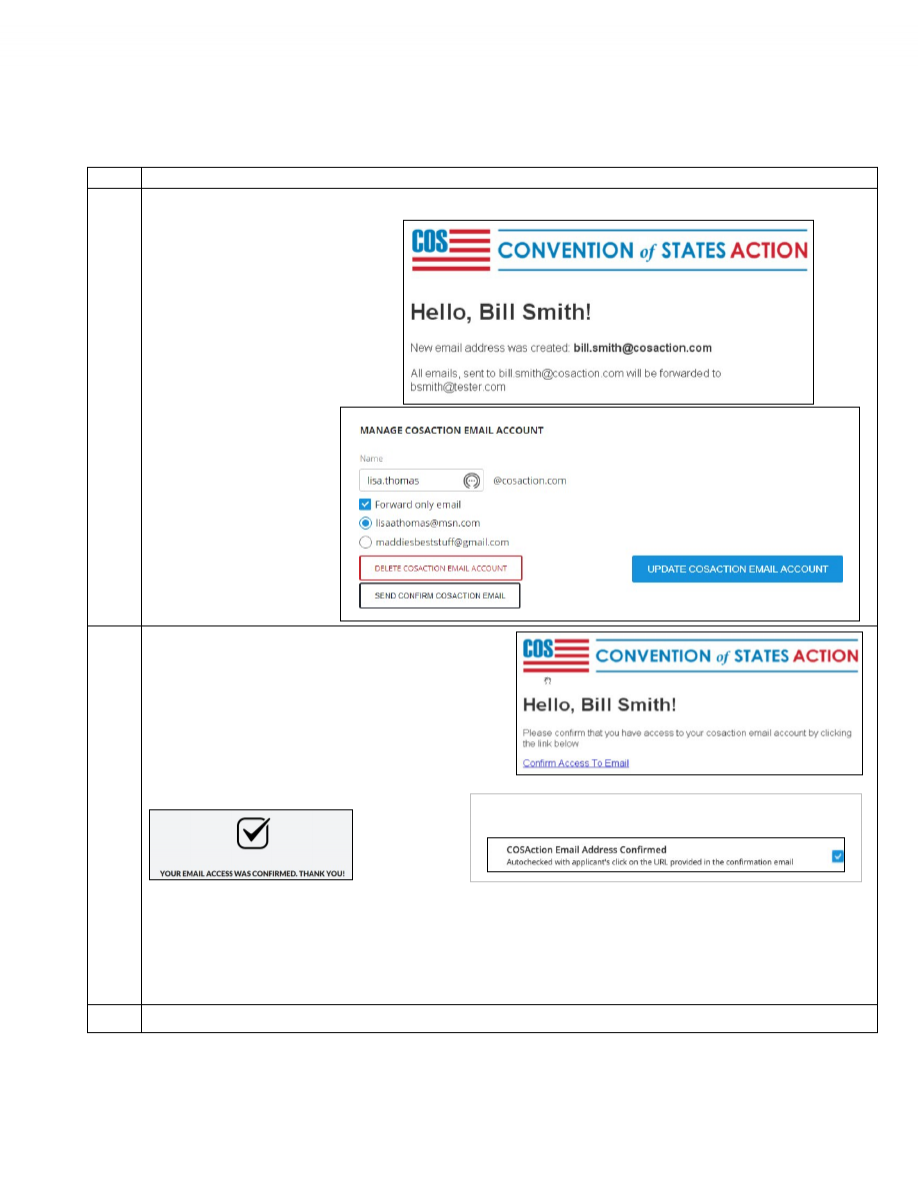
Once you’ve confirmed the details, click
CREATE COSACTION EMAIL ACCOUNT
.
This action triggers an automatic email
like this one, notifying the applicant of
the new account:
After you create the account,
the options in the
MANAGE
COSACTION EMAIL ACCOUNT
section change:
4
Click
SEND CONFIRM COSACTION EMAIL
.
This action will generate an email like this one:
Note:
You might want to ask the applicant to let
you know when he or she has confirmed access.
When the applicant clicks the confirmation link,
he or she sees this message:
The LMT also adds a checkmark to the
COSAction Email
Address Confirmed
item in the
ONBOARDING CHECKLIST
.
IMPORTANT NOTE:
You must confirm the cosaction.com email account separately for each application being
processed. Any number of these emails may be sent, and they will all contain the same confirmation link, if for the
same application. The link will remain valid until any one of them is clicked, after which it will expire, causing any
subsequent clicks to present a 404 error page. Once confirmed, the
SEND CONFIRM COSACTION EMAIL
button for that
specific application will no longer be shown.
5
Go to
Task 6: Invite the Applicant to the Slack Workspace
.
Task 9: Invite the Applicant to the Slack Workspace
CB: T
OOLS
: L
EADERS
O
N
-
BOARDING
G
UIDE
V
3.1 Sep
29, 2021
18
Introduction
At this point, you’ll want to invite the applicant to his or her state’s Slack workspace.
This task covers the steps for performing this task and includes information about training resources for
Slack.
S
TEP
A
CTION
1
Note:
An invitation to join a Slack Workspace must be created in Slack by an administrator.
(The invitation should use the
applicant’s cosaction.com email address. See Appendix B for information about avoiding duplicate Slack accounts.)
If you are
not an administrator of the Workspace for the applicant’s state, you must contact a user who is and ask that person to
create the invitation for you. If you don’t know who the administrators are, follow the procedure below to find and
contact one. (These instructions assume you are already a member of the Slack Workspace for the applicant’s state.)
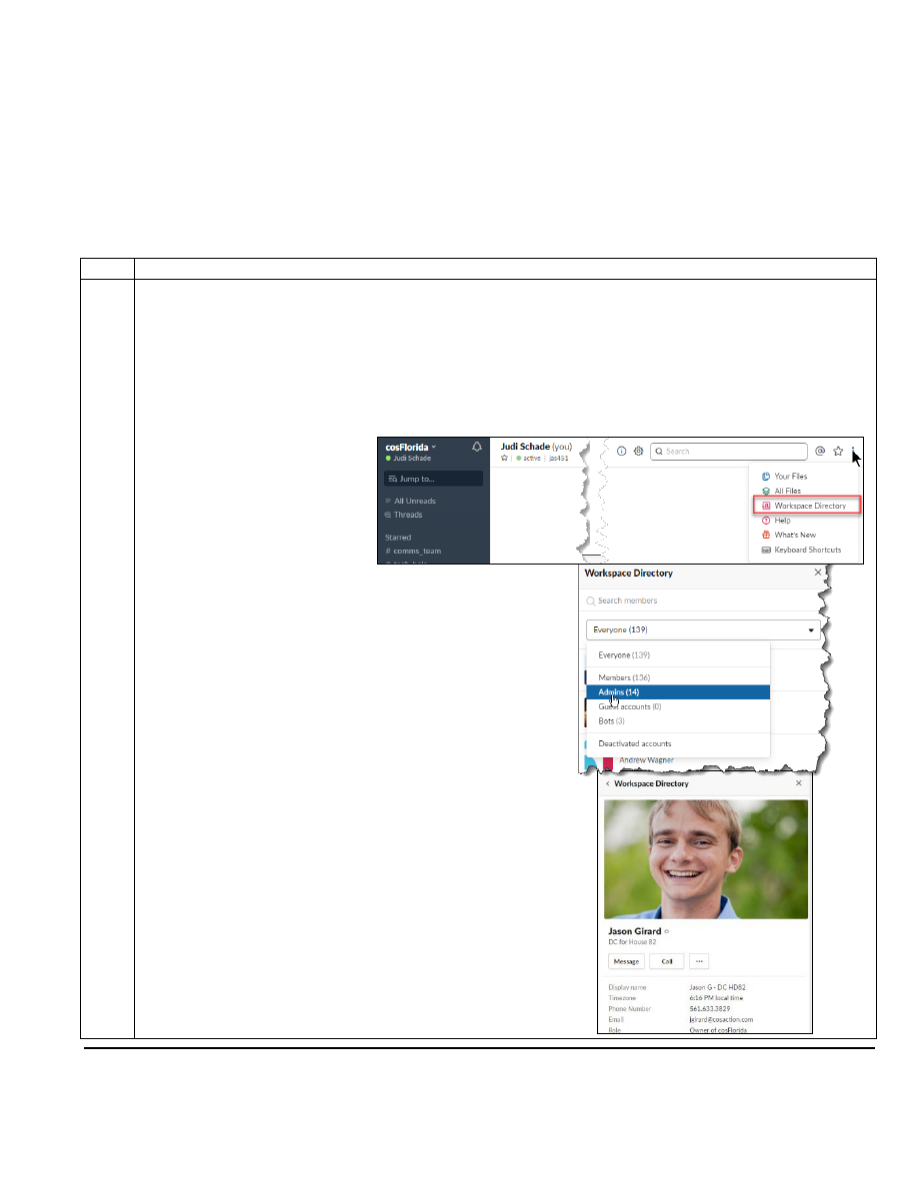
a. Log into the Slack Workspace to which you want to invite the applicant.
b. Click on the
More Items
icon (three dots) at the top right corner of the workspace to reveal a list of selections.
c. Select
Workspace Directory
.
d. Click the down arrow to the right of the field just below
the
Search members
field and select
Admins
.
You will see a list of all users with the Admin role for that
Workspace.
e. Click the name you want.
The pane changes to show information about that admin
and includes tools for making a computer-to-computer call
or sending a direct message.
f. Click either the
Message or Call button
to contact the admin
with your request to send an invitation to the applicant. Ask
the admin to let you know when the invitation has been sent
so you’ll know when to follow up.
Continued on next page
Task 9: Invite the Applicant to the Slack Workspace
(continued)
CB: T
OOLS
: L
EADERS
O
N
-
BOARDING
G
UIDE
V
3.1 Sep
29, 2021
19
S
TEP
A
CTION
2
Follow the steps in Task 1 to access the CB LMT detail page for the applicant.
3
In the
EMAIL
section, create and send an email to the applicant advising him or her to follow the directions in the Slack
invitation email as soon as possible and let you know when it’s done.
Include instructions for accessing the
Slack: Basics
training video in the
Help Desk Knowledgebase
.
EXAMPLE:
Hi, Lisa,
I hope you’re as excited as I am that there’s only one more important task for you to complete and then we can
officially assign you to the role of COS State Director!
You’ll soon receive an email inviting you to join your state’s Slack Workspace. Your task is to sign in and become
familiar with it. Slack is an online communication and collaboration hub that COS uses at the national, state, and
team levels to share information and collaborate on projects. As a COS leader, you will use Slack often.
Please let me know as soon as you have accessed and examined the Slack Workspace so I can mark your training
as completed and officially assign the SD role to you.
To learn how to use Slack, you can access a Slack: Basics training video in the COS Help Center Knowledgebase by
following these steps:
1.
Go to the Help Desk URL:
https:%%//%%help.conventionofstates.com/
2.
Click Sign In the upper right corner of the login screen.
3.
Click the Sign in with COS button.
4.
Click Knowledgebase on the horizontal navigation bar under the COS logo.
5.
Click 2. State Leader Core.
6.
Scroll to the bottom of the list and click Slack: Basics.
7.
View the video and if you want additional information, click the link underneath it.
4
Once you’ve confirmed the applicant has joined the state’s Slack workspace, check off that item on the
Onboarding
Checklist
.
IMPORTANT NOTE:
The cosaction.com email account must be confirmed separately for
each
application being
processed, by using the
Send Confirm cosaction Email
button to send the email. Any number of these emails may be
sent, and they will all contain the same confirmation link, if for the same application. The link will remain valid until any
one of them is clicked, after which it will expire, causing any subsequent clicks to present a 404 error page. Once
confirmed, the
Send Confirm cosaction Email
button for that specific application will no longer be shown.
5
Go to
Task 7: Finalize Onboarding Activities
.
This is the end of the application processing tasks.
See the Appendices for additional information.

Appendix A: Links
CB: T
OOLS
: L
EADERS
O
N
-
BOARDING
G
UIDE
V
3.1 Sep
29, 2021
A
PPENDIX
A P
AGE
A1
Introduction
List of links (URL’s) for further information
LINK
DESCRIPTION
//https:%%//%%conventionofstates.com/take_action//
// //
TAKE ACTION - List of leadership roles
where Patriots may apply for one of
the leadership roles
//https:%%//%%cosuniversity.com///
// //
Convention of States University – must
be signed on to CitizenBuilder to access
https://dashboard.conventionofstates.com/tools/university/students
COS Student List
https://drive.google.com/open?id=1RwwfTw-
O1BcHQcuwDg2Pnzlha8w2lge
COS State Team Manuals
https:%%help.conventionofstates.com/kb/faq.php?id=124 //\\ \\ //Help Desk Knowledge Base Accessing //\\ \\ //COS University for leaders and District//\\ \\ // //\\ \\ //Captains//\\ \\ // //\\ \\ //https:%%www.youtube.com/playlist?list=PLWlXaxtQ7fUb1WqLJD//
qJFGQsAXU7CjoGz
Slack Help Playlist
Appendix B: Handling Exceptions & Variations
CB: T
OOLS
: L
EADERS
O
N
-
BOARDING
G
UIDE
V
3.0 D
EC
2, 2020
A
PPENDIX
B P
AGE
B4
Overview
The tasks and steps on the previous pages of this guide assume the application will progress all the way
through the vetting and onboarding process. However, there are times when you will encounter
exceptions. The additional tasks covered in this Appendix address those exceptions:
1. Rejecting an application
2. Unassigning a role
3. Reopening an application after it has been rejected or a role has been unassigned
4. Changing the “
Assigned to
” leader in the LMT
More about
the LMT
Additional Purpose
You can also use the LMT to manage existing assigned leaders, some of whom might have more
than one role.
The LMT List
The LMT creates a new entry not only when a volunteer submits an application on the Take Action
page of the COS website but also when a leader with access to the Leader Positions tab in a
volunteer’s profile assigns a role.
(
Note
: Assigning a role from the Leader Positions tab is an
exception
that should only be used to “promote” an existing leader to a different role when that
leader is well-known enough that completing another application is not considered necessary.)
The LMT list includes a separate row for each role for each leader, regardless of how that role was
associated with the leader’s profile.
Applications for the Volunteer Role
On the LMT detail page, you will not see an
Onboarding Checklist
for the
V
OLUNTEER
role because
that role is not subject to the structured onboarding flow explained in this document. (Also, you
would not normally create a cosaction.com email account for this role.)
Rejecting an
Application
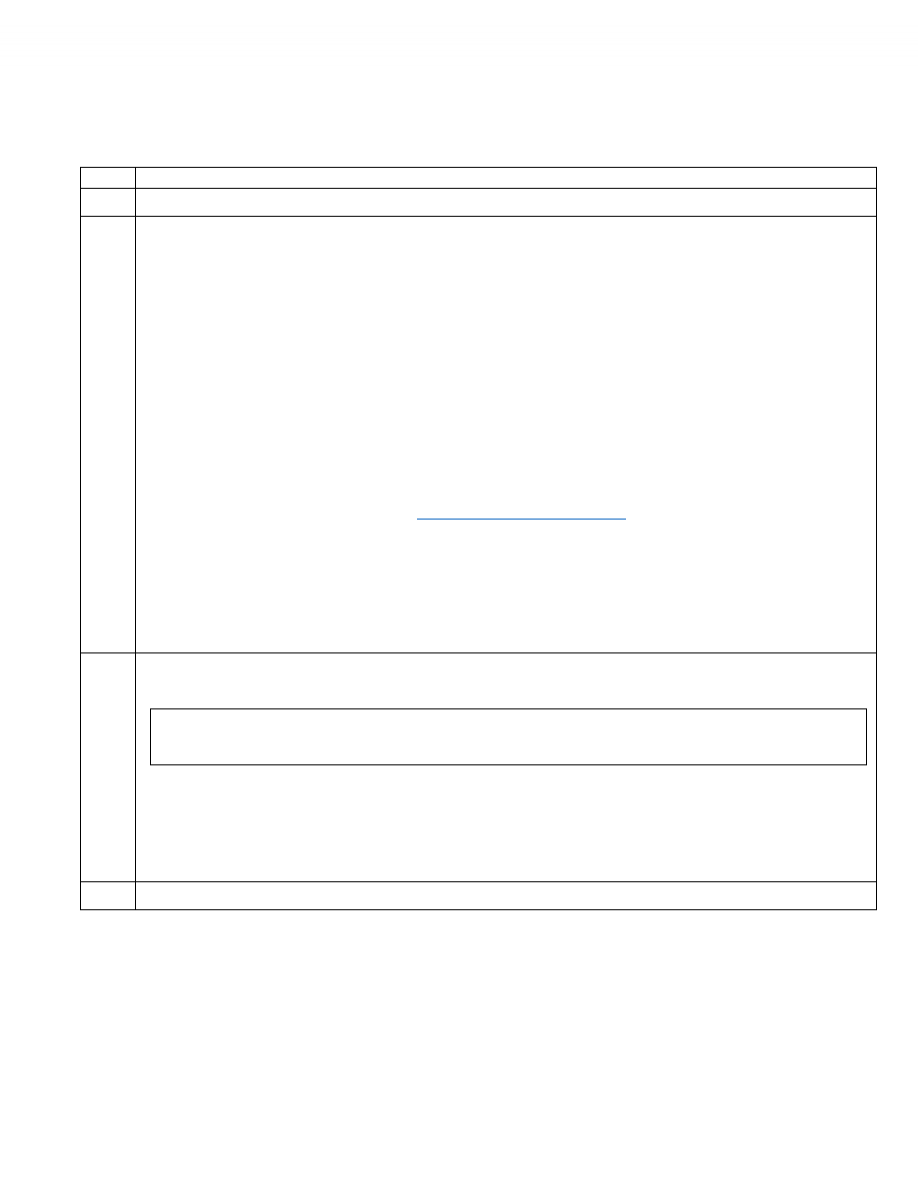
If at any time during the process, you decide an applicant is not a fit for the selected role, click on the
red
REJECT
button
in the
ROLE/ASSIGNMENT
MANAGEMENT
section.
NOTE:
You might take this
action after a phone call
for which you created a
note with one of these
two
ACTION TYPES
:
See “
More about Adding
Notes”
later in this Appendix.
The system will change the status to
Rejected
, finishing the process.
Continued on next page

CB: T
OOLS
: L
EADERS
O
N
-
BOARDING
G
UIDE
V
3.1 Sep
29, 2021
Appendix B: Handling Exceptions & Variations
(continued)
A
PPENDIX
B P
AGE
B4
Unassigning a
Role
IMPORTANT NOTE ABOUT ACTION BUTTONS IN THE ROLE/ASSIGNMENT MANAGEMENT SECTION
These buttons change according to the status of an application. At times, you might
see as many as four different buttons.
After you assign a role in the
ROLE/ASSIGNMENT MANAGEMENT
section, an
UNASSIGN
button
appears:
If there is a legitimate reason the leader should no longer have the selected role, click the
UNASSIGN
button to remove the role.
The system changes the role status to
Former
in the LMT list and adds a “
System action
” note in
the
NOTES AND COMMENTS
section of the LMT detail page stating the position was removed by
you. The note includes the information you entered in the
REASON
field.
Reopening an
Application
You can reopen the process for a role with
Former
or
Rejected
status by
using the
REOPEN APPLICATION
button in the
ROLE/ASSIGNMENT
MANAGEMENT
section.
This action places the application back into
Open
status. and starts the entire applicant process flow
again. The
ONBOARDING CHECKLIST
will appear on the LMT detail page, regardless of when the
original application was submitted
Note:
The
Assigned To
name does not change automatically when a different leader reopens the
application. Once the application is in process, you can use the
Pickup the Process
button to make the
change. See the next section for details.
Continued on next page
CB: T
OOLS
: L
EADERS
O
N
-
BOARDING
G
UIDE
V
3.1 Sep
29, 2021
Appendix B: Handling Exceptions & Variations
(continued)
A
PPENDIX
B P
AGE
B4
Changing the
“Assigned to”
Leader
The purpose of having an
assigned
leader is to let others know which leader is taking primary
responsibility for processing an application. Typically, the
assigned
leader should be the one who
takes the
Reject
or
Assign
action.
The LMT automatically assigns an application to the leader who enters the first note in the
NOTES
AND COMMENTS
section of the detail page. Throughout the process, multiple leaders may participate
by entering notes and even
Rejecting
or
Assigning
the role. All those notes will show the name of the
leader who entered them, but the
assigned
leader for the application does not change.
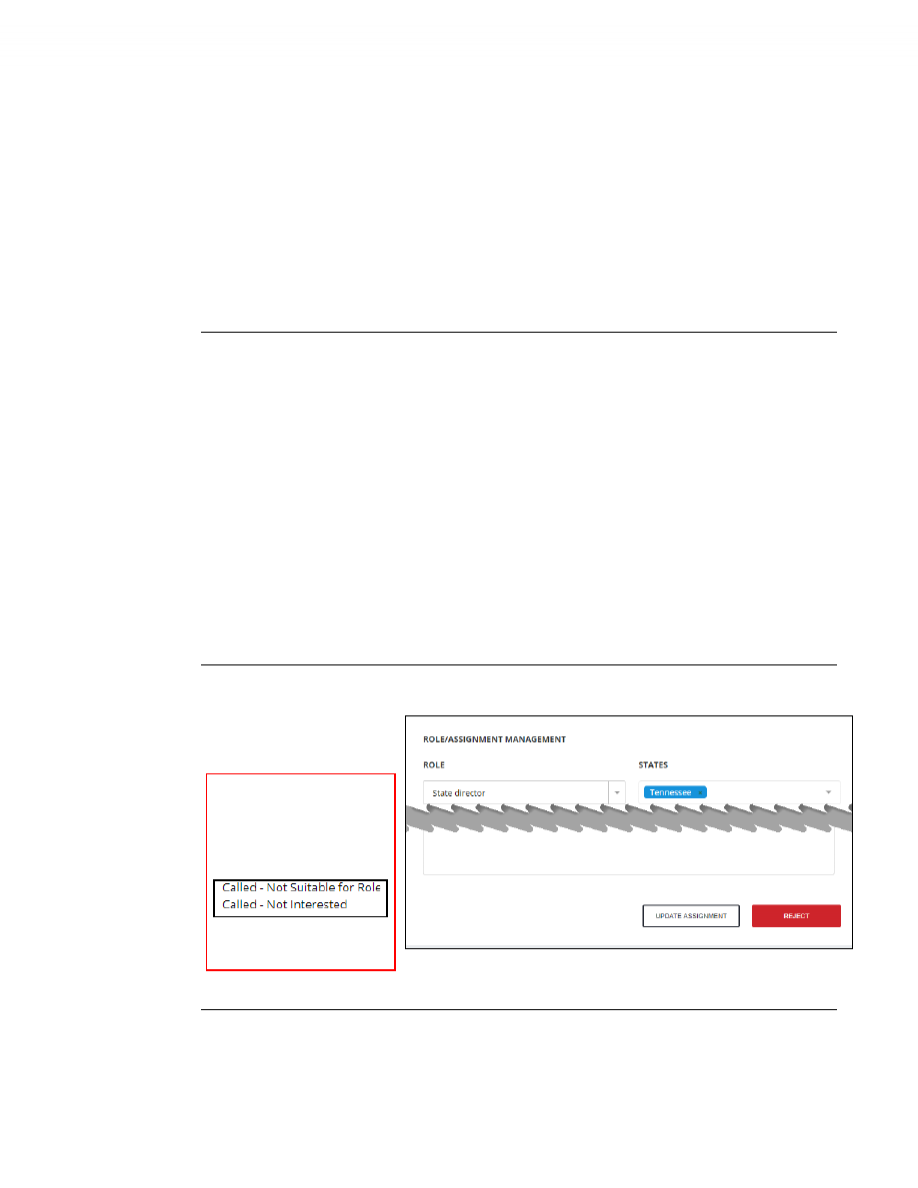
If another leader desires to be shown as the
assigned
leader, he or
she can make the change while the application is in the
In Process
or
Onboarding
status by using the
PICKUP THE PROCESS
button in the
ROLE/ASSIGNMENT MANAGEMENT
section.
Note:
This button only
appears to leaders other than the one who is already assigned.
More About
Adding Notes
Notes are Important
At every appropriate step in the process, it is important to add detailed notes describing each
contact with a new applicant and any other information relevant to the vetting and onboarding
process. This is critical not only for your own recollection, but also for others who might later
need to review or manage this leader.
When you select “
Not Suitable for Role
” or “
Not Interested
” in
Task 2 Step 4
, be sure to explain
your reasoning in your notes. Having detailed notes for
Rejected
or
Unassigned
leaders enables
others to determine whether
Former
or
Rejected
leaders should be eligible for reconsideration if
they reapply or express renewed interest.
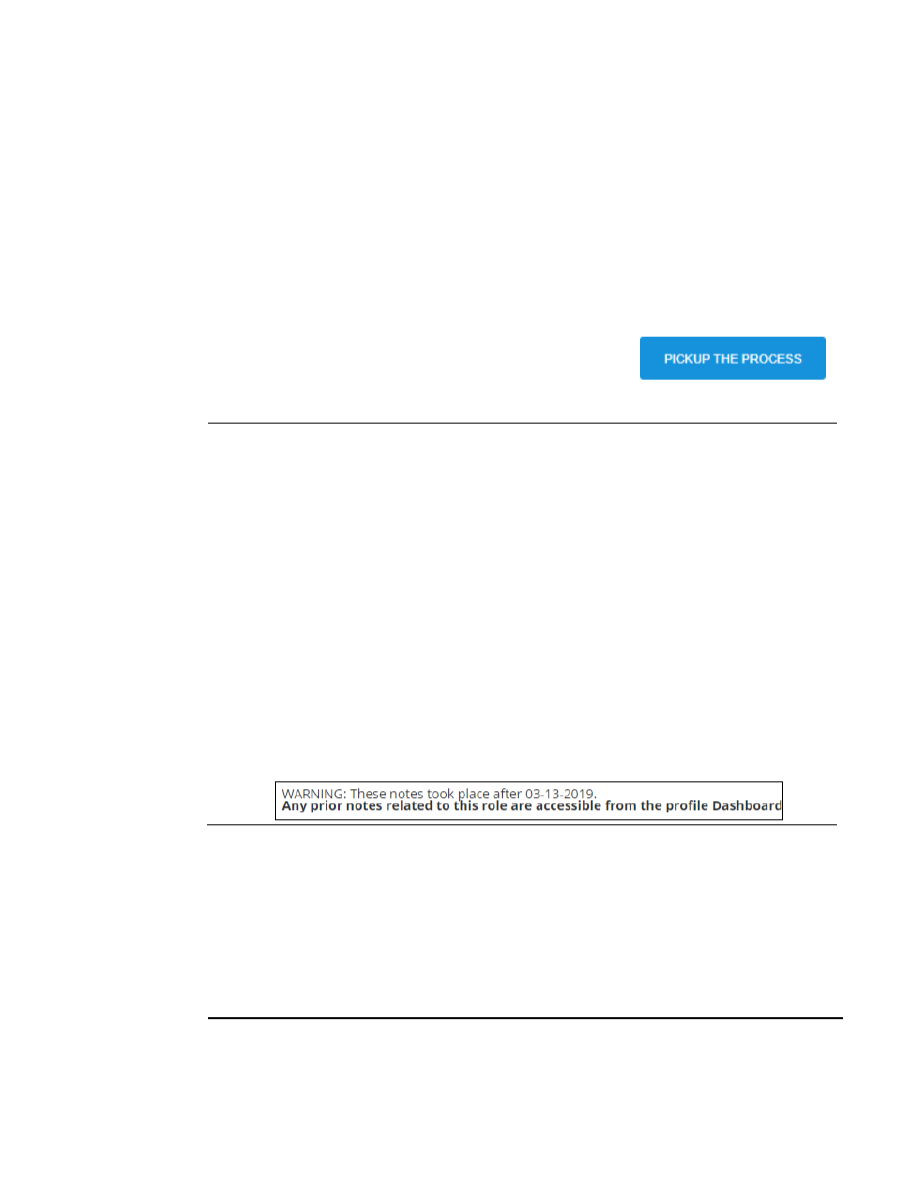
Notes are Role-specific
If there is more than one role listed under
APPLICATIONS HISTORY
on the LMT detail page, you
must select a specific role to see all the related notes. You will see only the notes for the selected
role.
This role-specific notes feature was added to the LMT effective 3/14/2019, so any LMT activity
notes entered prior to that date will be shown in the profile Dashboard,
not
the
LMT.
•
To remind you, this note appears in the
NOTES AND COMMENTS
section:
Avoiding
Duplicate Slack
Accounts
When a volunteer has more than one email address and a Slack invitation is sent to each, if the
volunteer clicks the link in each invitation, multiple Slack accounts are created. To prevent duplicate
accounts, we must use only the
cosaction.com
email address for all Slack invitations. Not only will this
help prevent the limited number of free Slack accounts from being wasted but it will also avoid
confusing others who might not know which account to use when “mentioning” or opening DMs.
You can use Slack’s Workspace Directory to check for existing and deactivated accounts by following
the procedure in Task 6 Step 1. Workspace Owners and Admins can also check for pending invitations,
which they can resend or revoke.
Continued on next page
CB: T
OOLS
: L
EADERS
O
N
-
BOARDING
G
UIDE
V
3.1 Sep
29, 2021
Appendix B: Handling Exceptions & Variations
(continued)
A
PPENDIX
B P
AGE
B4
More about
Assigning
Roles
(
see Task 8)
General
In
CB, Roles
determine the functions to which you have access (what you can do) and assigned
STATES, REGIONS and DISTRICTS
determine whose data you can see. REGION and/or DISTRICT
assignments limit access to those selected, while leaving them blank grants access to the entire
selected
STATES.
Assignments for each role should be set according to the access needed for that
specific role.
It is critical that assignments for certain roles (DC and RC in particular) be set properly for various
automated aspects of CB to function as intended. Because at some point in the future, CB will treat
assignments separately for each role with respect to the tools available for that role, you might have
to assign some leaders to multiple roles to properly define their access and responsibilities.
Example:
DCs who might need to handle Followups for their entire states should not be given full state access
with their DC role. Instead, they should be assigned as Followup Team Members with full state access, and
their DC assignments limited to their assigned district(s).
DC & RC Roles
Because these roles are treated in special ways in various aspects of CB, they MUST be limited to their
proper assignments. DCs need to be assigned to specific HD(s), and RCs need to be assigned to specific
STATE REGIONS.
Example:
For DCs, the Followup Tool and District Dashboard have a column entitled Has DC, where the pop-
up window will show the DC(s) assigned to the supporter’s district. This is done by looking only at the HD
part of the assignment. Likewise, RCs are identified in other areas solely by the REGION part of their
assignment. Certain automated notifications that go out to DCs and RCs are based on the HD and REGION
part of their assignments, respectively.
Single Leader
Most leadership roles include a companion “team” role, allowing many volunteers to contribute as a
team, but there should only be one volunteer per STATE, REGION, and/or DISTRICT designated as the
“leader” in that role. This is especially important for the DC role because of various CB features that
assume only one assigned leader. An example is the use of merge tags in Followup email templates
that include reference to the DC assigned to the new supporter’s district. If there were multiple DCs
assigned, the emails could inconsistently reference different DCs. This same concept also applies for
multi-state assignments. If for example State Grassroots Coordinators are assisting other states, they
should be assigned with the SGC Team role for the other states rather than adding those STATES to
their existing SGC role.
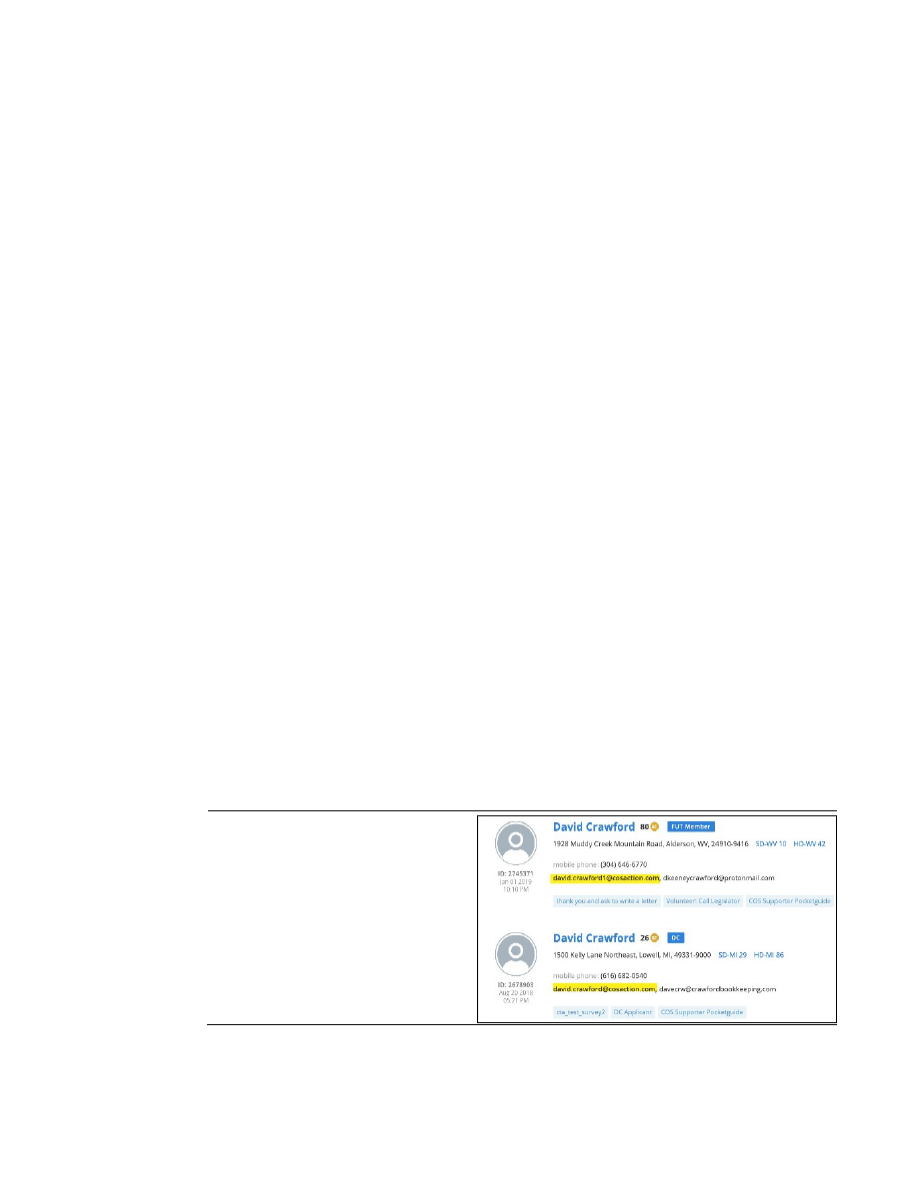
When a
COSAction
Email Account
Already Exists
If you cannot assign a cosaction.com email
account because the account has already
been assigned to another leader, alter the
email name to make it unique. You can
change the first name to a nickname, add
a number, or add the state initials so it is
unique to the system.

CB: T
OOLS
: L
EADERS
O
N
-
BOARDING
G
UIDE
V
3.1 Sep
29, 2021
Appendix C: Suggested Summary of Onboarding Tasks
A
PPENDIX
C P
AGE
C1
The involvement of the SIA in Onboarding at the State level is at the discretion of the State Director or
the State Leadership Team. An SIA may perform some or all of these tasks depending on the State’s
need. Since the SIA is responsible for training and technical help, they should understand and be able
to perform the tasks associated with onboading a new applicant so that necessary help can be
provided to the State.
Task
Summary
Action
1
Find and
e
xamine
o
pen
a
pplications in the L
eadership
Management Tool
2
Make the Initial Call
On completion: Add
Called – Meaningful Interaction
note
System: auto-checks the
Initial Call
Made
checklist item
3
Perform the Vetting Process
as defined by the State Leadership
Team
On completion: Add
Vetting
note
System: changes status from
Open
to
In Process
and
auto-checks the
Vetting
checklist item
4
Conduct the Onboarding Process
At start: Add
Onboarding Initiated
note
System: changes status from
In
Process
to
Onboarding
and
auto-
checks the
Onboarding Initiated
checklist item
On completion of each item manually enter checkmark:
Leadership Role Manual Reviewed
COSUniversity Reviewed
Enrolled in COSUniversity
Reviewed COSAction Email Address
Manual checkmark for each
5
Create a COSAction.com Email Account and
s
end Confirm
COSAction email
On verification of auto-check: Proceed to Task 6. (any number
of resends of the confirm email may be sent if needed)
System: auto-checks the
COSAction Email Address
Confirmed checklist item upon
confirmation
6
Invite the Applicant to the
State
Slack Workspace
u
sing
COSAction Email Address
When Invite accepted: manually
check the
Joined Slack Team
7
Finalize Onboarding Activities
When Task 6 complete: Add
Onboarding Training Completed
note
System: auto-checks the
Final
Onboarding Training Completed
checklist item and enables the
Assign
button in the
Role/Assignment Management
section
Adjust the Role and Assignments as appropriate, then click the
Assign
button
System:
changes status from
Onboarding
to
Assigned
|
|
—-
| Page Metadata ||
|Login Required to view? |No |
|Created: |2023-10-30 18:40 GMT|
|Updated: |2024-10-31 03:00 GMT|
|Published: |2023-10-30 05:00 GMT|
|Converted: |2025-11-11 12:28 GMT|
|Change Author: |Kristen Stanciu |
|Credit Author: | |